Tutorial

How to loop through each row in Excel in Microsoft Power Automate for Desktop

How to loop through each row in an Excel file in Microsoft Power Automate for Desktop

Graphical user interface, application, table, Excel Description automatically generated

Do you have trouble looping through rows in Excel in Microsoft Power Automate for Desktop? Fret not! This is a common struggle, and we’ll help you learn how to do it.

With Microsoft Excel being so pervasive in our work and/or school lives, automating repetitive tasks in Excel is one of the most useful ways for everyday users to make their lives easier using Microsoft Power Automate for Desktop. But looking through the myriad Microsoft Power Automate for Desktop actions, it may not be obvious how to make them repeat (loop) for each row in Excel.

Today, we will be walking you through how to loop through each row in Excel, using two different methods.

We will be using the following Excel file to demonstrate both methods. There are 10 rows of data in this Excel file, and both solutions will teach you how to loop through each row and retrieve the individual values.

Excel data that will be used to demonstrate how to loop through rows of Excel in Microsoft Power Automate for Desktop

Method 1: Looping through Excel data, retrieving the value of a single cell each time

Firstly, assuming the Excel file is already open, in your flow designer, add the “Attach to running Excel” action to your flow and select your desired Excel file.

The Attach to running Excel action in Microsoft Power Automate for Desktop

However, if the Excel file is not open, use the “Launch Excel” action instead.

If your Excel file is not already open, using the action Launch Excel intead

Next we will need to use the Loop action. A loop is a concept in Microsoft Power Automate for Desktop that allows you to repeat one or more actions multiple times. Through the loop action, you are able to specify the number of times you want an action to be repeated. In this case, as there are 10 rows of data, we would need to repeat the loop 10 times. In the Loop dialogue box, set the “Start from” parameter as 2. The 2 corresponds to the second row in the Excel file, which contains the first row of data.

Row number 2 in the Excel file corresponds to the first row of data

Set the “End to” parameter as 11 – which corresponds to the last row in the Excel file which contains data. The loop index will increment by a value of 1 as we want to loop through each row.

Setting parameters for the Loop action in Microsoft Power Automate for Desktop

Next, as we want the flow to read from the Excel file, we will select the “Read from Excel worksheet” action. In this case we want choose the option under “Retrieve” to retrieve the value of a single cell.

Configuring the Read from Excel worksheet action in Microsoft Power Automate for Desktop

To obtain the data from the first row and first column, set the Start column as “1” or “A” which would correspond to the column “First Name” in the Excel file. As for “Start row”, it is vital to note that the start row is not “2” but is %LoopIndex%. This is important because as we go through each iteration of the loop, the row changes from 2 to 11.

Configuring the Read from Excel worksheet action in Microsoft Power Automate for Desktop

The variable produced should be changed to %FirstName% in order to make it more intuitive.

Renaming the Variable produced as a best practice

Repeat this for all other columns as needed.

Method 2: Looping through Excel data using a datatable (retrieve values from a range of cells)

For this method, we will be using a concept called datatable. A datatable is a variable that stores data in the tabular form – similar to how you would store data using an Excel file.

Step 1: Read from Excel file and store the values as a datatable

Firstly, in the “Read from Excel worksheet” action, set the Retrieve parameter as “Values from a range of cells”. Next, set the Start column, Start row, End column, End row, according to your Excel file. In this case it is “A”, “1”, “G”, “11”, respectively.

Configuring the Read from Excel worksheet action in Microsoft Power Automate for Desktop to retrieve the values from a range of cells

Next, under “Advanced” turn on “First line of range contains column names”.

Turning on

After running this flow and clicking on “ExcelData” in the flow variables pane, you can see that the flow has extracted all the values from the Excel file and stored them as the variable “ExcelData” which is a datatable.

The resulting datatable after running the flow in Microsoft Power Automate for Desktop

Important Note: Datatables use a zero-based index. This means that the first row and column in the datatable have an index of 0 and not 1. So remember to use a zero-based index while retrieving data.

Zero-based index in Microsoft Power Automate for Desktop datatables

Zero-based index in Microsoft Power Automate for Desktop datatables also applies to columns

Step 2: Retrieve the values you need using for each loop

We will be using a for each loop, which is particularly useful while iterating over a datatable or list. In the for each loop, we need to specifiy the data table we wish to iterate over – in this case, it is “ExcelData”. The each of the loop, it will store the data under the variable called “CurrentItem”. The variable “CurrentItem” is a datarow containing all the values in that row.

Using for each loop to loop through the datatable obtained from the Excel file and retrieve the values


Work with Excel data in Microsoft Power Automate for Desktop now

So we’ve shown you how to loop through each row in Excel in Microsoft Power Automate for Desktop. Knowing how to do this step is crucial in making full use of the Excel actions in Microsoft Power Automate for Desktop. Now that you know how to do it, it’s time for you to try it out! 

How to loop through each row in an Excel file in Microsoft Power Automate for Desktop Read More »

Merge & Split PDF Files in Microsoft Power Automate for Desktop

How to Merge and Split PDF Files in Microsoft Power Automate for Desktop

Logo, company name Description automatically generated

Have you ever struggled to merge and split PDF files? In this article we will show you how to easily do so using Microsoft Power Automate for Desktop!

Why might you need to merge or split PDF files?

Maybe you have separate documents from different co-workers that need to be consolidated into one document for reporting or filing purposes. Or maybe you have scanned a big bunch of documents together, but they need to be separate documents.

There are many more reasons you may need to merge/split PDF files, and Microsoft Power Automate for Desktop can help you automate the process.

For those of you who prefer video instructions, you can have a look at the video below. If you prefer to read, just scroll down further for the article.

Skip ahead to the instructions you need:

  1. How to merge PDF files in Microsoft Power Automate for Desktop
  2. How to split PDF files in Microsoft Power Automate for Desktop
  3. How to split PDF files in Microsoft Power Automate for Desktop (unknown number of pages)

How to merge PDF files in Microsoft Power Automate for Desktop

For the merging files portion of the article, we will be using a folder which contains five individual PDF files as an example.

Folder containing PDF files to be merged using Microsoft Power Automate for Desktop

Firstly, we need to use the action “Get files in folders”. Under the “Folder” parameter, choose the right folder from the dropdown menu – in our case, it is the “merge PDF” folder. This action will retrieve all the files in this folder and store it inside a variable called Files which is essentially a list of file objects.

The Get files in folder action in Microsoft Power Automate for Desktop

Next, we will drag and drop the “Merge PDF Files” action, which can be found under PDF actions, into the main workspace. The input parameter in this case would be the “Files” variable

Where to find the Merge PDF files action in Microsoft Power Automate for Desktop

The merge PDF files action in Microsoft Power Automate for Desktop, and the options available

For the “Merged PDF path”, navigate to your desired folder – in our case here, it is the “Merge PDF” folder, and rename the file as “Merged PDF.pdf”. Remember to specify the .pdf extension.

Naming the merged file output

Next, just to be safe, select the “Overwrite” option for “If file exists”.

The Merge PDF files action in Microsoft Power Automate for Desktop, with Merged PDF path entered

Run the flow. Navigating back to your folder, will show that a merged file containing all five individual PDFs has been successfully created!

The resulting merged file found in the folder after running the flow in Microsoft Power Automate for Desktop

How to split PDF files in Microsoft Power Automate for Desktop

To explain splitting PDF files, we will be using a single PDF titled “Sample PDF File”, containing five individual pages.

The folder containing the Sample PDF file.pdf that will be split using Microsoft Power Automate for Desktop

Step 1: Extract PDF file page

Firstly, we will be using the “Extract PDF files pages to new PDF file” action. Under the “PDF file” parameter, specify the PDF file you wish to extract the pages from, and set the “Page selection” as the page you want to extract. For extracted PDF file path, extract the page into a separate PDF file and in this case we have renamed it as “Page 1.pdf”. Remember to always add the file extension .pdf.

Where to find the Extract PDF file pages to new PDF file action in Microsoft Power Automate for Desktop

Naming the resulting extracted PDF file including the .pdf extension

Lastly, select “Overwrite” from the “If file exists” dropdown menu.

The Extract PDF file pages to new PDF file action with the right options selected

After running the flow and navigating to our folder, we can see that we have successfully extracted the first page into a separate pdf file called page1.pdf

The resulting file in the folder after running the flow in Microsoft Power Automate for Desktop

Step 2: Implement a loop to repeat for other pages

Firstly, drag the “Loop” action into the workspace. Since we know there are 5 individual pages, we will set the “Start from” as 1, the “End to” as 5, and the “Increment by” as 1.

Setting up a loop in Microsoft Power Automate for Desktop to repeat the split PDF action steps described previously.

Then, drag your PDF action into the body of your loop. It should look like this:

The Extract PDF file action in the loop we set up in the previous step.

Remove the “Page selection” value which was hardcoded earlier, click on the {x} and choose “LoopIndex” from the dropdown menu.

Extract PDF files action

Changing the page selection option of the Extract PDF files action to %LoopIndex%

Likewise, do the same for the extracted pdf file path instead of hard coding the value to be “Page 1”, we shall use the dynamic value “LoopIndex” instead.

Choosing the %LoopIndex% variable for the extracted PDF file path

Changing the extracted PDF file path of the Extract PDF files action to Page %LoopIndex%.pdf

What this does is loop through the pdf file five times. The starting loop index is 1 and for the first loop we will extract the first page of the pdf file into a new pdf file called “Page 1.pdf” (i.e. Page %LoopIndex%.pdf, where LoopIndex is 1). For the second iteration, the loop index becomes the value of 2 and for this iteration will not extract the first page but will extract the second page and save the second page into a new file called “Page 2.pdf”. This continues so on and so forth until five iterations of the loop have been completed.

Running this flow, will cause the LoopIndex to increment from 1 to 5, and each page has been successfully extracted into five individual PDF files!

How the correct loop set up looks

The resulting split PDF files after successfully running the flow in Microsoft Power Automate for Desktop

However, it is important to note that we coded the loop to increase from 1 to 5 because we knew beforehand that the total pdf files file contains 5 pages. There would be a few change and additional steps to the flow in the scenario where we aren’t aware of how many pages the PDF file contains.

How to split PDF files when number of pages is unknown

We would need to change the “End to” in the Loop dialogue box to an arbitrary large number. In this case, we have set it as 100.

Changing the

We will need to create a label, using the “label” action under “Flow control”. Drag and drop the label to the end of the loop on your workspace.

Where to find the Label action in Microsoft Power Automate for Desktop

Name the label as “OutofBoundsError”.

Naming the label

Click on your “Extract PDF file pages into new PDF file” action, and the “On error” option.

Clicking on the

Under “On error”, choose the option “Continue flow run”, and “Go to label”. Select label as the “OutOfBoundsError”. Click save.

Selecting

Selecting the OutOfBoundsError label

What this does is: Initially we have increased the end loop index to 100, although our PDF file contains only 5 pages. Hence when the loop index reaches the value of 6, which is when it tries to extract page 6 of the PDF file, it will encounter an error as page 6 does not exist. The exception handling has been configured in such a way that when an error is occurred, the flow will jump to the “OutOfBoundsError” label, hence exiting the loop.

Graphical user interface, text, application Description automatically generated

Graphical user interface, text, application Description automatically generated

Now you have successfully managed to split a PDF into individual PDF pages, without hardcoding the number of pages in the PDF!

Automate splitting and merging PDF files in Microsoft Power Automate for Desktop

Now that you’ve learned how to use Microsoft Power Automate for Desktop to automatically split or merge PDF files, it’s time you integrate it into your daily work. We hope you’ve found our tips useful in helping you become more productive.

How to Merge and Split PDF Files in Microsoft Power Automate for Desktop Read More »

Get insights with Microsoft Power Automate's Process Advisor

Discover Optimisation and Automation Opportunities with Microsoft Power Automate’s Process Advisor

Get insights with Microsoft Power Automate's Process Advisor

Power Automate’s Process Advisor is a useful tool that takes the guesswork out of your automation.

You’ll have better ideas of where the bottlenecks are so you can drive improvements in the right places.

Analysis insights from the Process Advisor can also give you the information you need to prioritise your automation efforts.

In this article, we will learn how to generate these insights  with Process Advisor in Microsoft Power Automate.

What is Process Advisor?

Process Advisor records and analyses manual business tasks. It discovers inefficiencies and provides optimisation and automation opportunities. Process Advisor also automatically produces a process map that visualises the process which you can use to drive improvement in your business!

This article will cover two methods to get you started analysing your processes:

  1. Import an existing solution that includes Process Advisor recordings
  2. Create your own Process Advisor recording

For those of you who prefer to watch the video, you can have a look at the video below. If you prefer to read, just scroll down further for the article.


Method #1 Import an existing solution

Firstly, begin by logging into the Power Automate web portal (https://flow.microsoft.com) and selecting “Solutions” on the sidebar to the left.

Here, you can choose to import an existing solution.

The

Importing a solution in the Microsoft Power Automate web portal

You might encounter an error as shown below:

The error that you may encounter after importing your solution

If you do encounter the error, refreshing the page will allow the Test Solution to be uploaded successfully.

After refreshing the page, the

Clicking on your desired solution will show all the flows under it. In this case, the RPA in a Day Process Advisor has numerous desktop flows, inferred tasks and PM Recordings from different users.

Graphical user interface, text, application, email, website Description automatically generated

Graphical user interface, text, email, website Description automatically generated

You can also view these recordings by going to the sidebar and clicking Process Advisor > Processes.

A screenshot of a computer Description automatically generated

Opening one of the recordings will show the various steps under the flow.

Graphical user interface, application, Teams Description automatically generated

In order to Analyse the recording, click on the “Analyze” tab.

A screenshot of a computer Description automatically generated

Then select the “Analytics” tab.

A screenshot of a computer Description automatically generated

The Analytics tab reveals various details of the process – the process map, number of recordings used for the analysis, the average time taken for the whole process, and much more.

The process map on the right-hand side makes it possible to visualise and analyse the process by looking at the graphical representation of how your business process are performing. Any differences/discrepancies in the steps taken to complete the process will also show up, as well as the time taken for each step to be completed.

Graphical user interface Description automatically generated with low confidence

If you go to the “Application” tab, you can see details on which applications are involved in the process, and how much they contribute to the proces. In this case, through the two pie charts we can see that legacyinvoiceapp and outlook have significant contributions to the Time Spent and Actions by Applications.

Graphical user interface, application Description automatically generated

Method #2 Create your own solution

To create your own recording, go to the side bar, click on “Process advisor”, followed by “Processes” below it.

Graphical user interface, text, application, Word Description automatically generated

Graphical user interface, text, application, Word Description automatically generated

Click “New Process” (top left-hand corner), set your process name, select Recordings and click Create.

Graphical user interface, application Description automatically generated

Click “add a recording”.

Graphical user interface, application Description automatically generated

After selecting Add recording, you will be prompted to open Power Automate Desktop. Click on “Open Power Automate Desktop”

Graphical user interface, application, website Description automatically generated

The Recorder panel will then be displayed.

Graphical user interface, text, application Description automatically generated

You can then open the apps you perform your process on and record the actions you will take to complete your required process. (In our example, we’re using a legacy invoice processing app.)

Perform your steps on the apps as you would usually, and each action will show up under Recorded actions in the Recorder panel. When you’re done, click “Finish” on the Recorder panel.

Graphical user interface, application Description automatically generated

Next, select View recording.

Graphical user interface, application, Teams Description automatically generated

You’ll need to create labels to specify what activity you’re doing with the recorded actions (the activities will show up in your process map). Otherwise, you won’t be able to save.

Graphical user interface, application, website Description automatically generated

Click “Add activity” on the right-hand corner and Name the activity. Click “Save” after naming all the activities.

Graphical user interface, application, email Description automatically generated

Graphical user interface, application Description automatically generated

Graphical user interface, text, application, email Description automatically generated

After navigating to Processes, you will notice that the status of the Recording is “Not analyzed”.

A screenshot of a computer Description automatically generated

You can analyse the recording by clicking “Analyze” on the top ribbon.

Graphical user interface, text, application, email, website Description automatically generated

A screenshot of a computer Description automatically generated

Once you have analysed the recording, you will be able to see the “Analytics” option.

Graphical user interface, application Description automatically generated

Click on it to see the process map, time taken, and other information about your process.

Graphical user interface Description automatically generated

Navigating to the “Application” tab will allow you to see the various applications involved in the process and the time spent by each of them.

Graphical user interface Description automatically generated

Try out Microsoft Power Automate’s Process Advisor!

We hope you’ve found this overview of Power Automate’s Process Advisor useful.

But what we’ve shown here really only scratches the surface, though. We’ve only used a small set of recordings just to show the idea.

For Microsoft Power Automate’s Process Advisor to be impactful, you should try it out with real-life work processes that you want to make more efficient. The insights you gain from it might surprise you and help you drive major improvements within a short span of time. Think recording hundreds of instances of the process and getting all your team members involved in the process to record themselves too. This could be life-changing!

If you try it, let us know how it goes by leaving a message in the comments! We’d love to know your experience with Power Automate’s Process Advisor.

Discover Optimisation and Automation Opportunities with Microsoft Power Automate’s Process Advisor Read More »

Graphical user interface, application Description automatically generated

How to create a Dynamic Selector in Microsoft Power Automate Desktop

Graphical user interface, application Description automatically generated

If you have ever struggled to create Dynamic Selectors in Microsoft Power Automate for desktop, fret not! This article will walk you through the process.

Why use dynamic selectors in Microsoft Power Automate for desktop

One of the challenges of automation is making sure that the bots are robust, and can still work, even if conditions are not exactly the same. Making your RPA script dynamic helps to prevent your bot from breaking when there are changes in the UI.

If you prefer to follow video instructions, you can have a look at the video below. If you prefer to read, just scroll down further for the article.

Example situation requiring dynamic selectors when automating with Microsoft Power Automate for desktop

This article will be focused on the RPA challenge (https://www.rpachallenge.com/). The goal of the challenge is to create a workflow that will input data from a spreadsheet into form fields, which change position after every submission.

For this article, we’ll use the RPA challenge to illustrate the steps of creating dynamic selectors.

The task at hand will be to write a loop to fill in the values in every row from the excel given, regardless of the position of the fields on the screen.

Before you start creating your flow, first download the Excel file given on the website.

Graphical user interface, application, website Description automatically generated

Here’s what the data looks like:

Graphical user interface, application, table, Excel Description automatically generated

Read data from Excel

Now, on your Microsoft Power Automate for desktop, use the “Launch Excel” action, select “and open the following document” from the dropdown menu, and set the Document Path.

This will be followed by the “Get first free column/row from Excel worksheet” action.

Next, we will add the “Read from Excel worksheet” action into our flow. Remember that the End column and End row should be set as %FirstFreeColumn-1% and %FirstFreeRow-1%, respectively.

Launch Chrome, navigate to the website, and add UI elements

The next action we will be adding to our workflow is the “Launch new Chrome” action. Under “Initial URL”, copy paste the link for the RPA challenge, and set the “Window state” to “maximised”.

We will now begin creating our loop. Add the “For each” action to your workspace and set the “Value to iterate” as %ExcelData% (you can choose it by clicking on the {x} button).

Add the “Populate text field on web page” action within the “For each” loop. Click “Add UI element” under “UI element”.

Navigate to the browser and select the UI elements by holding down the Control key and left-clicking the element you want to select, then click Done, and click Save.

Graphical user interface, application Description automatically generated

Doing this is not enough. It will not work because every time we click submit, the field will have a different ID. So, we need to make this dynamic.

If you’re curious, this is what happens when you try to recapture a new selector for the same UI element after clicking submit. Note the different IDs.

Graphical user interface, text, application, email, Teams Description automatically generated

Creating a dynamic selector in Microsoft Power Automate for desktop

At the browser (on the RPA Challenge page), right-click on the field you’re working on – in this case the “First Name” – then click “inspect”. Under the elements tab, look for a common name that does not change after you click submit repeatedly. In this case, the “labelFirstName” remains the same.

Copy the text, including the part before “labelFirstName”. See our example below, enclosed in the red box.

Toggle back to Microsoft Power Automate for desktop. In the UI Element pane, click the 3 dots next to the UI Element you’ve selected earlier, and click “Edit Selectors”.

Graphical user interface, text, application Description automatically generated

A dialogue box showing “selectors of the UI element ” will appear. Click the 3 dots beside one of the selector for the UI element:

Graphical user interface, application, Teams Description automatically generated

The Selector builder dialogue box will appear. Unselect the “Custom” button at the bottom.

Then, remove the id and paste the copied text block you copied earlier. This will allow your selector to work even after clicking the “Submit” button—you have a dynamic selector!

In the UI elements pane, rename the UI element to “FirstName”, so that you can refer to it easily later on.

Next, we will need to add another element for the “submit” button on the webpage. Follow the same steps as above and rename it as “Submit”.

Add the “Press button on web page” action and set the UI element as “Submit”.

However, if we stop here, the flow will not work the next time it’s run. Click on the 3 dots icon icon next to the “Submit” element. Click on “Edit selectors”.

Once the Selectors of UI element “Submit” dialogue box opens up, click “Edit selector”.

Uncheck all the different attributes, enabling only the Class attribute.

Double-click on the “Populate text field on webpage” action we added earlier, and enter %CurrentItem[‘First Name’]% in the “Text:” field, and click Save. This takes the current value from the column “First Name” in the Excel file and populates it into the First Name field on the RPA challenge web page.

Graphical user interface, application Description automatically generated

After running the flow, you will see that the flow is working and successfully filling in the “First Name” field from the data in the given Excel file!

Create your own custom selectors

Protip: You can also create your own custom selectors using the Type attribute.

We will illustrate this with the example of the Submit button.

Start by inspecting the elements of the Submit button as we did earlier, then copy the type=”submit” (see picture below) from the elements tab.

Text Description automatically generated

Next, you’ll need to and paste what you copied into the “Selector builder”.

To do this, go to the UI Elements pane, click on the 3 dots beside the Submit UI element, and select “edit selectors”. In the Selectors of UI element “Submit” dialogue box, click “New”.

Graphical user interface, application, Teams Description automatically generated

Then, replace the class with type=”submit”, which you copied earlier.

Now you have two selectors. So if the first selector does not work, the loop will try again using the second selector.

Now, repeat all earlier steps with the remaining fields – Role in Company, Company name, Last Name, Phone Number, Email.

Complete your Microsoft Power Automate for desktop flow

Now that your UI elements have been set up correctly with dynamic selectors, it’s time to complete the flow that will allow you to fill up all the fields in the RPA challenge correctly.

First, to prevent multiple instances of Excel to be open after running the flow multiple times, you can insert the close Excel action after the loop.

Graphical user interface, text, application, email Description automatically generated

You can also add the “Terminate process” action at the beginning, and select “EXCEL” as the process name.

Graphical user interface, text, application, email Description automatically generated

Next, work on getting your flow to fill up all the fields in the RPA challenge website.

Duplicate the “populate text field on web page” action you’ve set up earlier, and change the details (such as the “Text” field and the UI element for each action) to correspond to each of the fields.

To duplicate an action, you can select it and press Ctrl + C to copy, then Ctrl + V to paste.

Running the flow will show that you have managed to fill in all fields accurately from the Excel data given, regardless of the position of the fields! You have successfully created your own dynamic and customised selectors!

Start using dynamic selectors in Microsoft Power Automate for desktop

The example we show here is just the tip of the iceberg. There are plenty of ways to use dynamic selectors in Microsoft Power Automate for desktop to make your solution more robust. What are some of the ways you are thinking of using dynamic selectors in Microsoft Power Automate for desktop? Share it with us in the comments!

How to create a Dynamic Selector in Microsoft Power Automate Desktop Read More »

How to Extract Data from Web Pages in Microsoft Power Automate Desktop

Do you keep track of data from a certain web page constantly? Do you need to extract data from the web? In this article, we walk you through how to configure web automation and perform web data extraction with Microsoft Power Automate Desktop.

Once you master automating web scraping with Microsoft Power Automate Desktop, you won’t have to manually navigate to the website you always keep track of and do all that manual, error-prone — and most of all unsatisfying, tiring — work: entering the search terms, navigate to the right site, copying and pasting data, and more.

Here’s what we’ll cover:

If you’re someone who prefers video instructions, the content of this article is covered in the first 7 minutes of this video on our YouTube channel.

Before we start extracting data from the web pages with Microsoft Power Automate Desktop, you’ll first need enable the extension that will allow you to do that.


Enable the Power Automate Desktop Extension for Web Automation

Graphical user interface, application Description automatically generated

Before your perform web automation, you’ll need to enable the Power Automate Desktop Extension.

You can refer to this URL – https://docs.microsoft.com/en-us/power-automate/desktop-flows/using-browsers or go to Power Automate Desktop and navigate to Tools, select Browser Extension and click Google Chrome

Graphical user interface, application, Word Description automatically generated

Install the extension and click close.

Graphical user interface, application Description automatically generated

That’s it! With this, you’re ready to start using the web automation actions in Microsoft Power Automate Desktop and be on your way to scraping data form the web with Microsoft Power Automate Desktop.


Web Automation Actions in Microsoft Power Automate Desktop

You can search for keywords in the action pane to find these actions that help you with web automation:

  • To open a browser, use “Launch new Chrome”
  • To close a browser, use “Close web browser”
  • For other actions related to web automation, you can simply search “web”, and you’ll find a long list of actions you can use, such as “Press button on a web page”, “Extract data from web page”, “Get details from web pages”, and more.

Graphical user interface, application, Word Description automatically generated


How to Search and Extract Data from the Web

To illustrate how you can extract data from the web with Power Automate for desktop, we will go through a simple use case that will involve the main actions you will need to use when scraping data from a website.

Let’s create a robot that does the following:

  1. Asks the user to input a city name
  2. Opens a chrome browser and navigate to google.com
  3. Types in the search bar ‘weather in (city) ’, and executes a search.
  4. Extracts the temperature data
  5. Displays the temperature in a message box


Step 1: Ask the user to input a city name

Find the “Display Input Dialog” action and drag it onto the workspace.

Type “Please enter a city” on the input dialogue message and enable the option “Keep input dialog always open” to set this on top. Click Save.

Graphical user interface, application, Word Description automatically generated


Step 2: Open a Chrome Browser and Navigate to google.com

Drag the “Launch New Chrome” action to the workspace. Type www.google.com as the initial URL, Select “Maximized” as window state, and click Save.

Graphical user interface, application Description automatically generated


Step 3: Type in the search bar ‘weather in (city)’, and executes a search

Before you proceed, you’ll need to navigate to www.google.com on your Chrome browser. Open a chrome browser and navigate to google.com.

Graphical user interface, application, Teams Description automatically generated

Then, open Microsoft Power Automate Desktop and Click “Add UI Element”

Graphical user interface, application, Word Description automatically generated

Hover and look for , then hold down the Ctrl button and left-click to select it.

A screenshot of a computer Description automatically generated with medium confidence

Then, search for “weather in London”.

A screenshot of a computer Description automatically generated with medium confidence

Hover your mouse over the “Google Search” button, then hold down the Ctrl button and left-click the button to select the UI element.

After selecting the UI Element, perform a normal left-click to perform the Google search.

A screenshot of a computer Description automatically generated with medium confidence

When the result loads, hold Ctrl button and left-click to select the UI element of the data that we want to extract, then click Done.

Graphical user interface, text, application, Teams Description automatically generated

As a best practice, rename the UI elements selected in the previous steps with recognizable names, so you can refer back to them easily in later steps, for example we’ve used “Search Bar”, “Search Button”, and “Temperature”.

Graphical user interface, text, application Description automatically generated


Step 4: Extract the temperature data

Before we can scrape the temperature data, the robot needs to key in the search terms — as requested by the user — into the Google search bar. Search for the “Populate text field in web page” action and drag it into the workspace.

Click UI Element and select “Search Bar”

Graphical user interface, application Description automatically generated

Type “Weather in” on text field, then click {x} and choose “UserInput”, then click Save. The variable %UserInput% was the city name we asked the user for in the first step with the “Display Input Dialog” action.

Graphical user interface, application Description automatically generated

Search for the “Press button on web page” action and drag it into the workspace.

Click UI element, choose “Search Button” and click Select and then Save.

Graphical user interface, application Description automatically generated

When you search for web automation actions, you’ll notice that you’ll get a few actions for web extraction that sound similar.

What’s the difference among these three actions?

  • Extract data from web page: to extract a single value, or it can be a table as well
  • Get details of web page: to extract information such as we page description, web page title, web page meta keywords, web page descriptions, web page source, and web browser’s current URL address
  • Get details of element on web page: to only extract the detail of a particular element – such as in this case, where we want to just extract the temperature number of an element.

Choose “Get details of element on web page” and drag it into the workspace. Click UI element, choose “Temperature” and click Select.

Graphical user interface, application Description automatically generated

Rename the variable produced (Attribute) to “Temperature” for easy reference and click Save.

Graphical user interface, application Description automatically generated


Step 5: Display the temperature in a message box

Drag the action “Display Message” into the workspace.

We want to display the sentence “Temperature in ____ (city) is ____ (temperature).”

So, type “Temperature in”, or any other message you’d like to display to the user. Click {x} to find available variables to get values from. In this case, we choose “UserInput”, which is the city name input by the user in the earlier step.

Graphical user interface, application, Word Description automatically generated

Click {x} to find the other variable – Temperature. Click Select, then if you’d like to, you can enable “close message automatically” before clicking Save.

Graphical user interface, application Description automatically generated

Save the Flow, close your Chrome browser, and you’re ready to run your Flow!


What happens when you encounter an error with your UI element?

When we first ran this flow, we discovered that the Google search button was not working. To fix it, click the UI Element tab button on the extreme right side (shown below with a red box).

Graphical user interface, text, application, email Description automatically generated

Click the three dots beside Search Button

Graphical user interface, text, application, email Description automatically generated

Click Edit Selectors

Graphical user interface, text, application, email Description automatically generated

Click on New and Select “Selector with recapture”

Graphical user interface, application Description automatically generated

Hover over the Google Search button, hold Ctrl button and left click on Google Search button to re-select it.

Graphical user interface, application Description automatically generated

To delete the first element that didn’t work, click the three dots beside the first element, then choose Delete.

Graphical user interface, text, application Description automatically generated

Close the window and we’re all set! Run the Flow again, and you should be good to go!


Start automating web scraping with Microsoft Power Automate Desktop

This simple use case of scraping the temperature data from a Google search is just the tip of the iceberg — it’s just a warm-up. Keep a lookout for more videos and articles from us with more advanced web extraction tutorials using Microsoft Power Automate Desktop.

For now, get start automating web-scraping for websites that you often keep track of and save yourself all the time and effort taken to manually navigate to a website, key in search terms, copy and paste data. You’ll avoid careless mistakes too!

How to Extract Data from Web Pages in Microsoft Power Automate Desktop Read More »

Configure Flow Control in Microsoft Power Automate Desktop

How to Configure Flow Control in Microsoft Power Automate Desktop

Configure Flow Control in Microsoft Power Automate Desktop

When designing flows, controlling the order in which actions and subflows are run is important for complex flows with multiple functions and error handling.

This can be done by using flow control actions in the application. It ensures a more efficient flow.

Learning objectives:

  • Learn how the flow works.
  • Learn how to use the flow control group of actions to direct and manipulate the flow.
Watch the video below, scroll past it for text instructions.

Comment

Comment facilitates flow design, allowing users to make notes and explain the logic of a set of actions. This action is recommended if you are designing a complicated flow so that the next developer or user will be able to understand before going through the sets of flow.

Inserting a comment in Microsoft Power Automate Desktop

Label

We can control the flow by creating a label, a label acts as the destination of a go to statement

Go To

This transfers the flow execution to another point indicated by a label so you have to select which label that you have created.

For example, create multiple labels (1, 2 and 3).

Configure flow designer

Display a message for each label 1, label 2 and label 3.

Deploy the Go to action at the start. For this example, we would like it to go straight to label 3.

However, if Label2 is selected, it will be directed straight to Label 2. After that, as the flow continues,  the display message box for label 3 will pop out.

This is how you can make use of the Label and Go to action.

Run subflow

This action allows you to execute an existing flow. When the subflow completes, the flow continues with the next action

  1. Select Run subflow

2.  Select Subflow_1 (or the name of the Subflow you have created). Next, if you were to run the flow, it will execute subflow_1 and after that it will continue the next action.

How can we stop a subflow? To do so, use the Exit subflow action or the Stop flow action.

Differences between these 2 actions:

Exit Subflow

  • To stop the subflow and go back to the point where it was run
  • Exit subflow action is not required at the end of a subflow

Stop flow

  • To stop running the entire flow
  • There is also an option to stop the flow with an error message

Example:

Following will be an example of how to use the Label, Go to and Run subflow Action. 

Create a flow where the robot asks the user if they would like to store a list of fruits into a text file. They will have an option to press the button, “Yes’ or “No”.

If the user selects “No” it will end the flow using the Label action. If the user selects “Yes”, the flow will continue by creating a list of fruits (Strawberry, Mango, Banana and Apple) and writing it to a text file using the Write text to file action. This file can be found in the desktop folder.

To improve this flow, use the Run subflow action. Create a new subflow (in this example, we named the subflow as WriteTextFile

Configure flow designer_example 8

Next, copy the flow and paste it in the subflow you have just created. Delete the flow in the Main workspace. Deploy the Run subflow action in your main workspace and select the subflow you have created. This will help you categorize different sets of actions into a categorized subflow which will allow your flows to look neater and more organized.

For better understanding, Run this flow and you can see that it behaves exactly the same as before.

On block error

This is an error handling action It will help to control your flow, not to stop the process. You can choose to set a new variable or run another subflow or throw an error.

  1. Deploy the On block error action.
  2. Name it “TryWriteTextFile”

3.  Save action

4.  Create a New variable and name it as %Filename% with a value of “-”

5.  Deploy write text to file action. File path of %Filename%. On Text to write, type “Hello”. Disable the Append new line function.

6.  Save action 

If we run the flow in this example, it will display an error message saying that “invalid directory specified”.

The downside of this is that we are not able to get the exact error message to continue the flow. So in this case, we cannot make use of this On block error action as there are certain actions that have the On block error action in it. For example, in the write text to file action, there is an On Error option. Here you can indicate your own new sets of rules by clicking on  Advanced

 Set a new variable under Failed to write text to file.

Click on Continue flow run where the flow will continue running and go to the next action.

Likewise for Invalid directory for file, set a new variable and Continue flow run.

When you run this flow, it will behave the same as before.

It depends on the process, whether to use the On block error or make use of each action’s exception handling (On error). However, this is limited and not all actions provide the On error option.

How to Configure Flow Control in Microsoft Power Automate Desktop Read More »

How to use conditionals in Microsoft Power Automate Desktop

Microsoft Power Automate Desktop provides you with conditional actions to develop flows when you want to automate your tasks. 

What are conditionals? Conditionals allow you to modify a flow’s behavior based on certain conditions. Conditions may include the comparison of two values, or more specific information, such as the existence of a file or the contents of a web page.

There are 2 groups of conditional actions:

  • The If group of actions
  • The Switch group of actions


The If group of actions

The If group of actions allow users to evaluate whether a certain condition is true. The structure of the If conditions are:

  • Initial conditions (which includes all the If conditions)
  • Alternative condition (which may be added using the ‘Else if’ action) This condition will only be considered if all the previous conditions were false.
  • An Unconditional alternative may also be added, using the ‘Else’ action. This will run only if all the conditions before it has failed
  • All conditional blocks in the ‘If’ group end with the ‘End’ action

In this example, we will deploy some of the available If actions to understand what functions they have.

  1. Use a Get special folder action to retrieve the path to the desktop.
  2.  To check if a folder named Records exists in the desktop, use the If Folder Exists action, and configure its input (refer to image below):              

3.  Add an If File Exists action inside the If block to check if the Expenses Excel file exists inside the Records folder. Configure its input (refer to image below):

4.  If the file exists, move it to the desktop folder using the Move Files action. Otherwise, the user should be notified.

5.  Add an Else action inside the second if block, and a Display Message action to inform the user that the file has been moved.

6.  Finally, in case the folder itself does not exist, add an Else action inside the first If block, and a second Display Message action to inform the user that the Records folder does not exist.

Note : Remember to save your file.

When you run your flow, you should see this display message box stating that the Records folder does not exist when the condition falls under the Else statement.

Note : Do try this out with different scenarios to get a better understanding of the If action.

The Switch group of actions

The Switch group of actions is used when a flow’s next steps depend on the value of a specific variable.

Let’s go through an example to see the Switch group of conditions in action.

  1. Get the Current date time using GetCurrentDateTime action

2.  To get the current day of the week, use Switch action and enter the following inputs (refer to image down below)

The value indicated in the Switch, will be used for conditional checking

3.  To check if the day is Saturday, use the Case action. Use the Display message action to display the message box title “it’s Saturday” along with the message “Make the most of it!” when the CurrentDateTime action detects that it is a Saturday.

4.  Repeat these steps (using Case action and Display message action) for when it is a Sunday.  Use the Display message action to display the message box title “it’s Sunday” along with the message “Make the most of it!” 

5.  For other days, add display message “Let’s get cracking” with title “it’s weekday’ by using the Default case action

6.  Once you are done, save the file and run the flow. If it is currently a weekday, this will be how the display message box will look like.

Conclusion

To conclude let us go through the differences between the different conditional actions. An If Else statement can test expression based on range or values or conditions. Whereas a Switch statement is based only on a single integer, a numeric value or a string object. Using a Switch statement is usually more efficient than a set of nested If.

How to use conditionals in Microsoft Power Automate Desktop Read More »

Actions for text manipulation in Microsoft Power Automate Desktop

Microsoft Power Automate Desktop – Text Manipulation

Actions for text manipulation in Microsoft Power Automate Desktop

Microsoft Power Automate Desktop allows you to manipulate text and date time. Maintaining consistent text, numerical and date values are very important. This is especially true in some fields such as finance and logistics. 

In this article, you will be learning how to use a text group of actions to manipulate your text and date time values. 

All of the text group actions can be found here. When you want to perform actions with text type variables, you would need to specify the text either by entering it as input, or as a text variable. The actions store the output in a new variable.

We’ve made a video showing you all the text actions in Microsoft Power Automate Desktop, which you can see below. If you prefer to read about them, you can scroll past the video, and you’ll be able to read all about Microsoft Power Automate Desktop text actions.

Append line to text:

Firstly, we have the Append line to text action. This is to add a line of text to a single text value or list of text values. This action stores the resulting text as a new text variable. It is useful when you want to combine information into a single text or variable. For example, when you have system generated email, you might need to append(add) multiple information in the email body.

Quick tip A quick tip for beginners is that, whenever you are unsure of what an action does, and you would like more information, you can actually hover over the (i)  icon and read more. As u can see, it will be displayed in the black box to let you know more about the different parameters.

Get subtext action

Next, we have the Get subtext action. This is a very powerful action as we can extract a specific portion of a text or a list of text values. The variables produced here are stored as a text variable

  • Start index: Set the start index property to retrieve text starting at a specific   character position or at the start of the text. 
  • Length: Set the length property to end at another position or at the end of the text
  • Number of chars: Number of characters to retrieve. 
  • Note: that the character position uses a zero-based index, which means you start counting with the first character having the index 0.

Pad text

Pad text increases the length of text to a certain value. For this, you can add whitespace, word or phrase before or after the text or list of text values. This action will add characters that are fixed by you to the text so that the final text reaches your desired length. The action stores the padded text as a new text variable. 

  • Pad: Option to add to left or right side of text.
  • Text for padding: Character or text that will be added to lengthen the original text. 
  • Total length: The total character length of the final padded text. This means that the text for padding will be repeatedly added until the final text is of the specified length.

Trim text

The Trim text action allows you to remove whitespace from a text string. This includes whitespaces like space, tab, or new line. You can do so to the beginning, end or both of a text string. This is very useful, as your data might have an accidental space at the back at times and it could potentially affect the accuracy of your data. It is recommended as a best practice to use the trim text action to clean the data before performing text comparison. 

  • What to trim: Specify where white space characters will be removed from. 

Change text case

Use the Change text case action to change the case of the text value. You can do so to a single text value or list of text values. You may change the casing of a text to uppercase, lowercase, title case or sentence case. Upper and lower are pretty straightforward. For the title case, it is for when you want every word to begin with capital letters, and for sentence case, only the first word will start with capital letters.

Quick tip: When you are more familiar with the actions and know what actions you want to deploy, an alternative way to deploy these actions will be to use the properties. So for example, you want to change the text case or trim the text. You can just click on ‘Select variable’, look for the variable you want the action to be deployed on, click on the small arrow here and you can choose from the list of properties here which the application has for text values. So you can choose from the .trim property or change text case etc.

Create random text

The Create random text action helps generate random passwords according to your preferred text length, whether or not to include uppercase and lowercase letters, digits, and symbols. 

Split text

Use Split text action when you want to separate a single text value into a text list of items. Enter a value or a text variable as the input. Ideally, the text should include recognizable delimiters that separate the items. Select one of the standard delimiters or enter a custom delimiter.

  • Text to split: Enter a value or a text variable as the input here (The text should include recognizable delimiters that separate the items, such as comma in the example down below. The action will split the text separated by a comma and store them into a list)
  • Delimiter type: You can choose between standard or custom. 

‘Is regular expression’ is used when you want to specify whether the delimiter will be a regular expression. However, this is a more advanced topic, so I will not be going through this here. 

Replace text

Use the Replace text action to identify a string in a text and replace it with another string or character. You can customize the search to be case-insensitive, or to contain regular expressions. As mentioned earlier, regular expression is a more advanced topic that we will not cover here

Datetime actions

Now, onto datetime actions. You can find these actions under datetime at the actions panel.

Get current date and time

This action can be set to only get the current date or both date and time. You may also set the time zone property to the system default (which is what you have configured on your computer) or you can set a specific time zone which you will have options to choose from.

There are many properties you can choose from as well, like year, month or day. To view these properties, click on select variables (the {x} symbol), type CurrentDateTime, and click the small arrow beside CurrentDateTime, and you will see a drop-down list of all the properties for CurrentDateTime and you may choose the one you prefer.

Add to datetime

Use the add to datetime action to add a specific amount of the selected time unit to a datetime variable. It can be in seconds, minutes, hours, days, months or years. You may also just add a negative sign in front to subtract from the datetime. 

Subtract dates

The subtract dates action gives you the difference between 2 datetimes. You may choose to get the difference in days, seconds, minutes or hours. And that difference will be stored as the new variable. 

  • From date: The datetime to subtract the first datetime from. This will be the base datetime, so generally put the later date/time in this attribute. 
  • Subtract date: The datetime to subtract

What’s the difference between the add to datetime action and the subtract dates action? Overall, to find out  the difference between 2 datetimes, use subtract date. If you want to get the datetime after adding or subtracting a specified amount of the selected time unit to a datetime variable, use add to datetime.

Convert datetime to text

Converts a datetime value to text using a specified custom format. It has properties that contain several options regarding the format of the datetime input.

For example, convert a datetime variable that was created with the ‘Get current date and time’ action to text. Using this action, you can choose between a standard or custom format. When you choose a standard format, you have all of these options shown down below. 

When you choose custom format, just ensure that your combination is in a compatible datetime format. 

What do I mean by formats? The image below shows the various date formatting if you want a standard datetime format.

When you choose a custom format, you can specify the exact format you want using  different combinations of the representations shown below.

A way you can use this action is to add the new FormattedDateTime to the name of your new folders or files. This is especially useful when you generate many versions of the same files regularly, as is often the case with RPA, and you don’t want to overwrite the files.

Convert number to text

The Convert number to text action is used when you want a number or a numeric variable to convert to a text variable. You will have the option to set the number of decimal places to include as well. ‘Use thousands separator’ is for you to specify whether or not to use punctuation as a thousands 1000 separator, for example expressing “1000” as “1,000”.

Conclusion

Ensuring uniform data and text formats are important in many business processes. We hope that from this article, you were able to learn all about automating text processes and data manipulation using the text and datetime actions on Microsoft Power Automate Desktop.

~~~

Microsoft Power Automate Desktop – Text Manipulation Read More »

Everything you need to know about variables – Microsoft Power Automate Desktop tutorial

If you are new to Microsoft Power Automate Desktop and you do not have a programming background, a huge obstacle you will face is to fully understand various terms that you will encounter frequently. A very common term used in Microsoft Power Automate Desktop is “variables”.  To ensure a smooth process while developing your flow, it is vital to have a full understanding of how to handle variables.

While automating your tasks on Microsoft Power Automate Desktop, you will see yourself using the same information over and over again for different actions. For example, sometimes, you might want to store customers’ data, like the name and email that you have retrieved, and process them later in your flow.  

What are variables?

In short, variables allow you to store data/information from one action to use in another action when you need it later. Variables are like tags that you attach to data with a descriptive name of your choice, which you can then easily refer to when needed. 

Variables are like storage containers that store and save information while a flow is running. This information can be of any type, such as numbers, text, dates, files, folders and text. 

To use variables in actions, the name of your variables has to be enclosed in percentage(%) characters. For instance, you have a variable called ClientName, the proper way to express it as a variable is: %ClientName%. If the % sign is excluded, the application will read the value as a hardcoded content and not as a variable.

Create and Use variables

Microsoft Power Automate Desktop will create your variables automatically that the deployed actions require. This is to avoid the creation of any nonessential variables. However, you are able to create the variables manually and disable the automatically produced variables. 

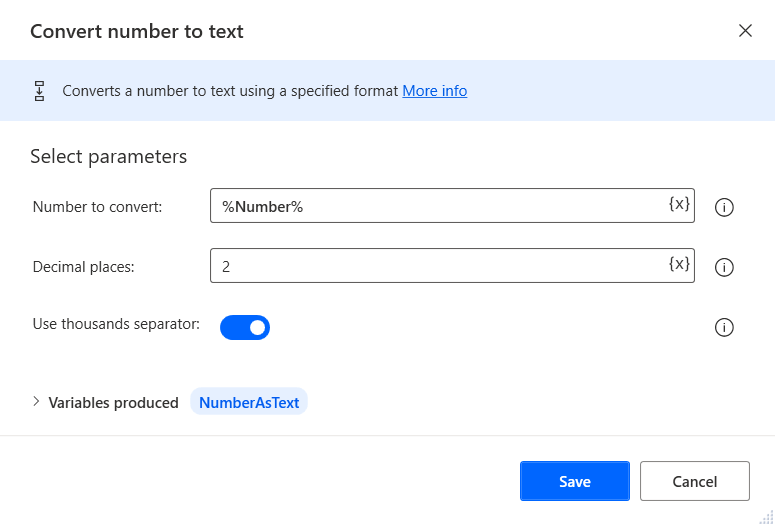
So how does the application automatically produce variables, and how do you identify them? Microsoft Power Automate Desktop will automatically produce variables that hold the results of the action whenever you add a new action to the main workspace. Over here in blue text is the variable that is automatically produced.

To change the name of the variable to something easier for you to identify, click on the variable and change as desired. 

If you know that you will not be using the variable produced by a certain action, you can choose to disable the automatic production of that variable. This will allow your variables pane to look more organized and less convoluted. 

To disable the production of variables you don’t need, simply click on the toggle switch icon to disable that particular variable. When the text changes to grey, it means that you have successfully disabled the variable.

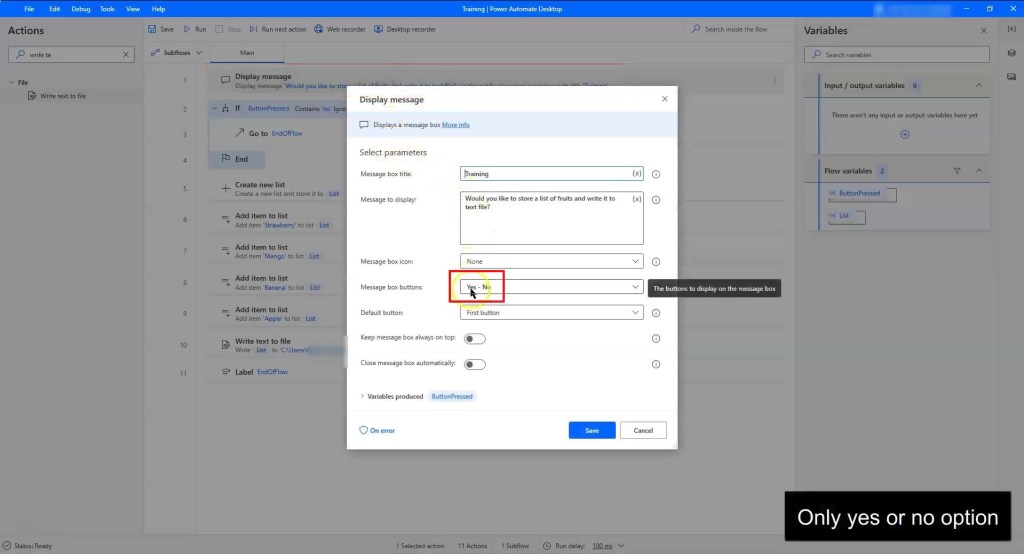
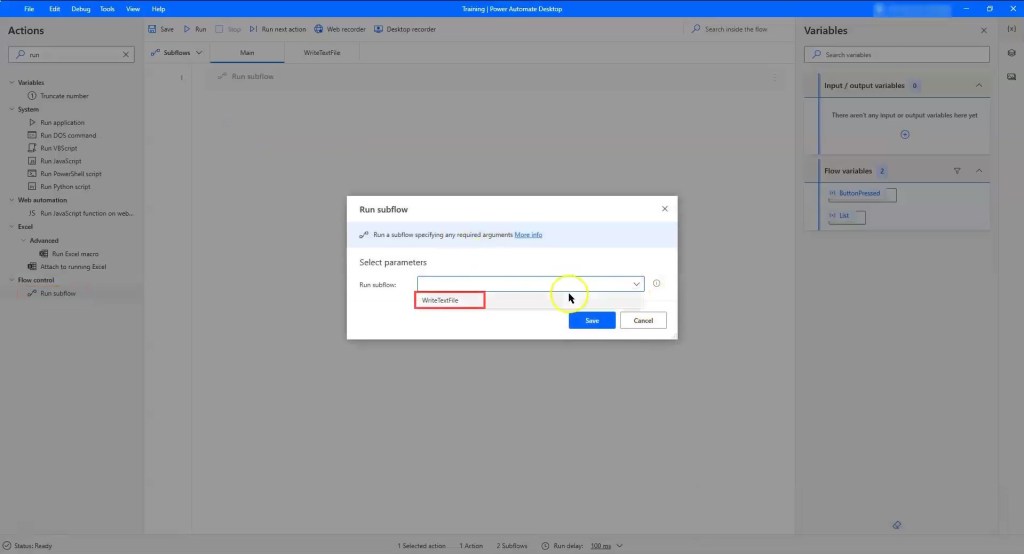
Once you have created your variables, you may need to use the information stored in the variable as input in other deployed actions in your flow. To do this, click on the {x} icon next to the field you would like to input the variable and pick the desired variable.

Note:  You have the option to use existing variables as outputs in other actions, but Power Automate Desktop will overwrite the previous content. This may cause confusion, so we don’t recommend it. 

Variables pane

The variables pane is located on the right side of the flow designer. It displays all the variables that have been created, along with additional information and controls to manage all of your variables.

There are two different forms of variables located in the variables pane to allow you to manage all the variables in your flow: input/output variables and flow variables.

Input/Output variables – With this, you can move data from other platforms to the Microsoft Power Automate Desktop or vice versa. Automation options are endless with this inbuilt feature. This is just a brief definition of input/output variables. We will go more in depth in future articles. 

Flow variables – List of all the variables that are available in the particular flow. This includes all the variables in the main and subflows. It does not include variables from other flows in your console. 

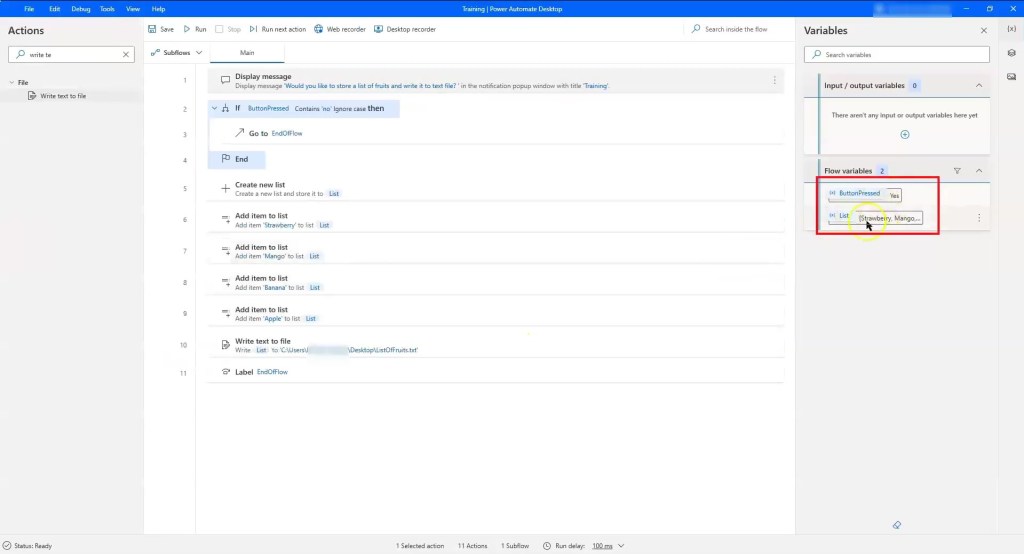
To display additional information on the variables, you can just double-click on the variable name. 

You can use the variable pane to see all the available properties of your variables. Properties contain parts of the information stored in the variable or extra attributes describing the variables.

While you are debugging your flows after facing errors, you can check each variable’s current value through the variables pane. Seeing how the flow changes the variables’ contents allows you to locate the source of error and correct it accordingly. 

To view more information or rename variables in the variables pane, just simply right click on the name of the variable or the vertical Ellipsis. You will be given the options to View, rename or Find Usage.

View – View Variable value

Rename – To change the name of a variable

Find Usage – Additional information will be displayed regarding that particular variable. You will be able to know which subflow it belongs to, which line(s) it belongs to and more information about the action it belongs to. When you double click on one of the results, it will direct you to the specific line that the variable is used in. 

If you have developed a very complicated flow with many variables, you can filter the variables based on Text value, Datetime, List of general values, General value, Numeric value. This allows you to be more efficient.

Data types

Microsoft Power Automate Desktop will categorise your variables to a specific variable data type based on the content.

There are over 40 data types on this application, but the more common data types are numbers, time and boolean. 

Quick tip: If you are new to Microsoft Power Automate Desktop, it is advisable to use different variables instead of converting variables type as you have to constantly keep track of which content you overwrite. This is to avoid any mistakes and confusion along the way. 

Some of the built-in data types have properties that are related to the value stored in the variables.

With these properties, you will be able to obtain information about the variables without the need for additional actions or complicated conversions.

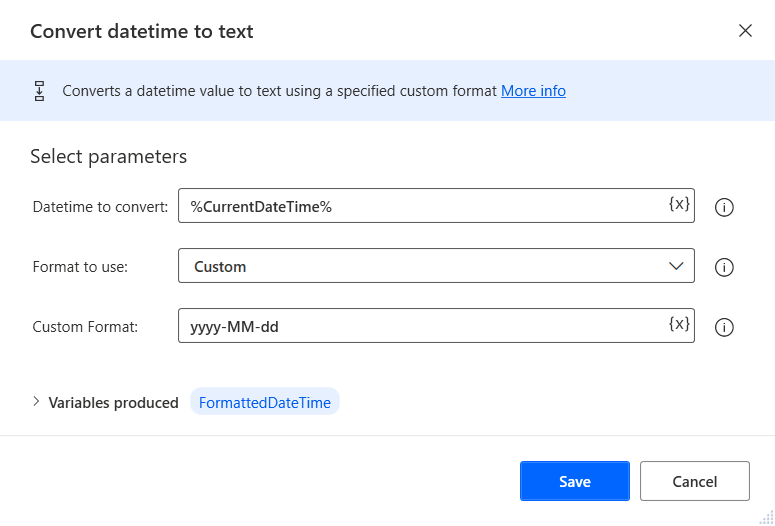
This information can describe the content of the variable or be a part of a multi-component content. For example, you can get the day part of a date or the size of a list with files.

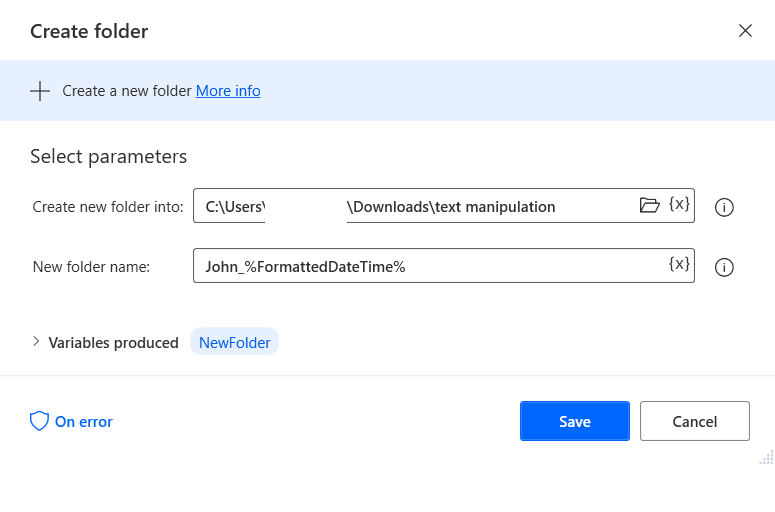
To access the value of a property, you can use the following notation: %VariableName.PropertyName%.

For example, if the flow contains a list of files called Files, you can get the number of the stored files using the expression: %Files.Count%.

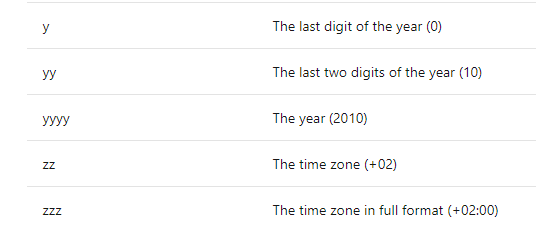
If you don’t know what properties are available for a particular variable and what the correct notation is, you can click on {x}, find your variable, and click the arrow beside it, as shown in the picture below.

Advanced data types

Advanced data types need specific treatment and handling. In this article, we will only go through two advanced data types: Lists and data tables.

Lists – A list is a collection of items that must be of the same data type. Use a list when you want to store and collate many information of the same data type. For example, you can create a list of text values, numbers, files, etc.

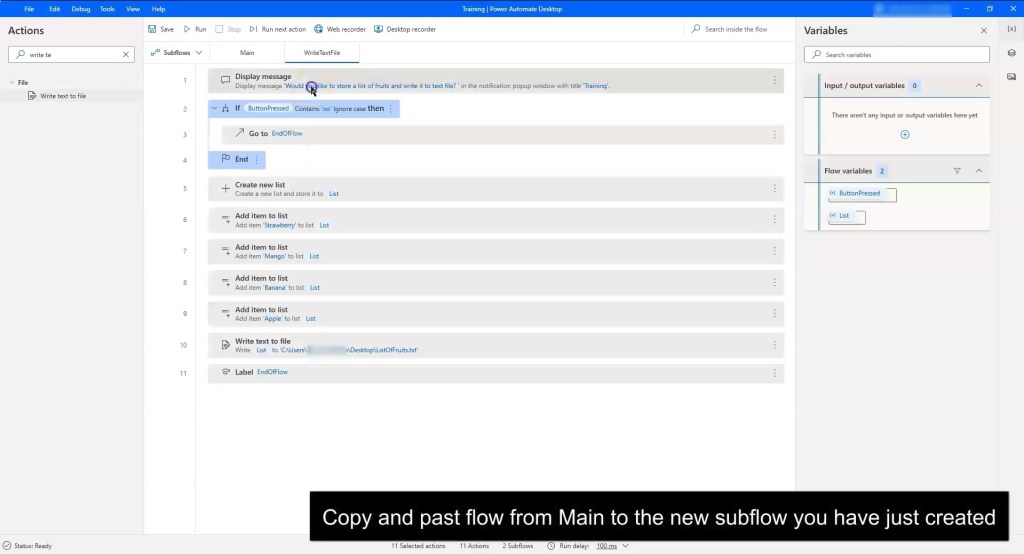
To create a new list, go to variables, click on the arrow beside it, and look for the action Create new list. A simpler way to do this is to search Create new list action on the search bar of the action pane. Then, add the action Create new list to the main workspace. 

Another way that is slightly different is to create lists through actions that generate lists as output, for instance Get files in folder action that returns a files list.

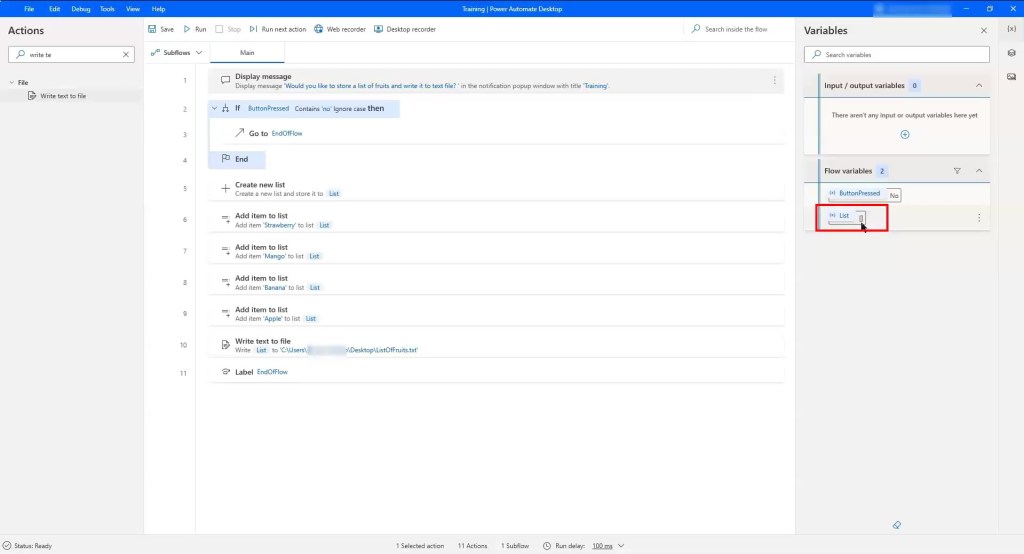
If you want to find a specific item in the list, you can use the following notation: %VariableName[ItemNumber]%.

For example, you can rename the first folder of the previously displayed folder list using this notation. Keep in mind that the ItemNumber should be 0 for the first item of the list. 

Data Tables – Use data tables if you want to store data in a table form. It is similar to excel—a data table has both rows and columns.

Each item stored in it can be retrieved through its unique row and column number. Consider data tables as lists that have other lists as items.

There is no direct way to create a data table, but you can create data tables through the Read from Excel and the Execute SQL statement actions.

If you want to find a specific data table item, you can use this notation: %VariableName[RowNumber][ColumnNumber]%.

For example, you can save Apple’s price inside a new variable (which we named %ApplesPrice%) using the following action. 

Note:  Keep in mind that the RowNumber and the ColumnNumber should be 0 for the first item.

Variable Manipulation

Earlier in the video, we learned that it is important to enclose your variables with % so that the app can identify them as variables. Some of you might wonder, what if I want to use the percentage sign as a simple character in a hardcoded text? All you have to do is to use double percentage signs like this: %%.

Hardcoded text – You might want to use hardcoded text values. To do so, use quotes to enclose your text values. Microsoft Power Automate Desktop will identify any value between quote characters as a text value and not a variable name. 

Variable Names – You might want to use multiple variables in an expression. To do that, simply add their names to the expression without further notation.

Basic Arithmetic – If you want to use mathematical operations, you can use plus (+), subtract (-), multiply (*)  and divide (/). You can use the addition operator to join strings. However, this does not include arithmetic operations with numerical values and variables. Adding numbers and text strings in the same expression will convert the numbers into text and join them with the other text strings.

Comparisons – Besides arithmetic operators, you can also make comparisons using the following relational operators:

Logical Operators – In many flows, you might need to check if a value meets some particular standards. To check conditions and implement more complex logic in a single expression, you can use the logical operators. The supported operators are AND and OR.

Parentheses  While creating complex expressions, you might want to prioritize some specific parts of them. To change an operators’ priority, use parentheses. Power Automate Desktop handles parentheses the same way as algebra and programming languages.

Conclusion

While developing your flows on Microsoft Power Automate Desktop, you will always be in contact with variables. Hence, it is important for you to understand what variables are and how to handle them when developing your flows. Just remember that variables allows you to store and reuse data and to use the variables pane to control or make changes to your variables.

Tags: Microsoft Power Automate Desktop, Robotic Process Automation, Console, Flow designer 

Learning resources: https://docs.microsoft.com/en-us/learn/modules/pad-variables/

Software Version: Microsoft Power Automate Desktop 2.7.49.21099

Everything you need to know about variables – Microsoft Power Automate Desktop tutorial Read More »

Microsoft Power Automate desktop tutorial for beginners – Interface tour

We’ve all heard about the power of automation, and how it is possible to automate mundane tasks we face in our everyday lives to boost our productivity and efficiency. Microsoft Power Automate Desktop is now free for all Windows 10 users, and if you can take some time out to learn how to automate business processes using this app, this could potentially be a huge deal for you.

Now that you have downloaded and installed Microsoft Power Automate desktop, let us take you on an interface tour to guide and help you get started with the platform.

The Microsoft Power Automate Desktop platform contains two main components which allows you to create flows: The Console and the Flow Designer. 

Console Overview

The console is the first window you will see once you launch and sign in to Microsoft Power Automate Desktop. The main feature of the console is to allow you to create new flows or manage your existing flows.

To create a new flow, click on the “+ New Flow” button at the top left of the screen. You will be prompted to name your flow.

Decide on a name for your new flow and click on “Create”.

This will direct you to the Flow Designer<hyperlink to Flow designer>  which we will be covering at a later part of this article. 

The console also allows you to select and manage a specific existing flow. To do that, right-click on the flow and you can choose any of the options provided. You can Start, Stop, Rename, Edit or delete the flow. 

Start – To run your flow

Stop – To stop your flow from running

Edit – This will direct you to the Flow Designer

Rename – If you would like to change the name of your flow

Delete – Delete your flow

Another alternative to manage your flows would be to use the icons next to the name of the flow. Likewise, you will be able to run, stop and edit your flows. If you click on “More Actions”, it is essentially the same as when you right click on the flow.

Tip: A faster way to start editing your flow would be to double click on the selected flow.

So, what happens when you run your flow from the console? When you click on “Start”, you should receive a notification at the bottom right as shown. In my case, I also have a display message box because the flow I ran involved a “display message” action. In your case, depending on the actions in your flow, you may or may not have any.

There are 2 ways to stop running the flow from the console: the stop icon and the “Stop” button on the notification box at the bottom right corner.

Flow Designer Overview

Now that you have an understanding of what the console is, let’s find out what the Flow Designer is and how it works.

Flow designer will be launched whenever you create a new flow or edit an existing flow. 

You may be wondering what a flow is. In the Power Automate universe, a flow is simply a series of actions that are run sequentially. By defining and then executing these actions, you are able to automate mundane and menial tasks and/or business processes which you used to perform manually.

The Flow Designer is the main workspace where development takes place. By using the workspace, you can develop flows that run in sequence or alter them using conditionals, loops, and flow control actions.

Flow Designer summary:

Action Pane

To utilize or search for actions, go to the actions pane located at the left hand side of the Flow Designer.

The actions are categorized into groups based on their functionality. You can find the actions you need by clicking the arrow next to each category, or you can search for a specific action on the search bar at the top of  the action pane.

There are 2 ways to deploy an action. 

You can double click on the action or drag and drop action to the main workspace.

For Microsoft Power Automate Desktop, the more common actions used include Excel and web automation. For example, you can send an email to a contact in a selected row in an Excel spreadsheet. The sequence of actions of your flow is very important to ensure your development runs smoothly without any errors. If you are faced with a situation where you need to reorder the actions, simply click and hold on the action and drag it accordingly.

There are many actions in Microsoft Power Automate Desktop that is really useful. For example, there are actions to work with texts and conditionals like if and else.

Main VS Subflows

At the top of the main workspace, you will see “Subflows” and “Main”. You may be wondering, what is the difference between the Main flow and subflows? And why is there a need to create subflows? This is to simplify complex flows that require many actions—maybe hundreds of actions. With subflows, it will be easier and less confusing to test out certain flows. 

To create a subflow, Click on “Subflows”, followed by the “(+)” icon.

You will be prompted to name your subflow, after you are done, click “Save”.

Variables Tab

Over at the right hand side of the flow designer, you will see the “{x}” sign. This is an indication for the variable pane. In short, a variable is a container to store data. This data is needed later on for the flow. 

UI elements Tab

The UI elements tab allows you to define UI elements. When you define UI elements, you can combine them with actions. This is used for websites and apps.

Note: UI stands for User Interface. For example, a button you can click on on your website.

Images Tab

This tab stores all the images that are used in the deployed actions, allowing you to access and manage them effortlessly.

Errors

While developing your flow, you may be faced with errors that will disrupt the entire automating process. An error pane will pop up at the bottom when there are any inconsistencies with the flow. Use the error pane to identify and rectify/debug those errors in your flow. 

Desktop/Web Recorder

Next, you will come across two features located at the top of the called Desktop and Web Recorder. Recorders are useful, because instead of building one action at a time, you can show Microsoft Power Automate Desktop how you would normally do the tasks that you wish to automate, and the app will translate it into a series of actions in the flow. 

If the tasks are desktop based, use the desktop recorder. If your tasks are web-based, you will need the web recorder. For example, when you use Microsoft Excel app, you will use the desktop recorder. However, if your data is situated in Google Sheets, then you’ll be using the web recorder. So to put it simply, as long as the task is done using a web browser, it should be recorded via the Web Recorder.

This seems like a huge game changer and it might feel like there is no point putting in so much effort learning about flows and different actions. However, do note that the recorder is not perfect, and there are situations which will require you to correct and make changes to the actions in the flow. 

Saving your Flow

Most importantly, it is good to develop a habit of saving your flows whenever the flow is complete or if you would like to take a break from automating the task. There are 2 ways you can do that:

  • Click on the save icon
  • Click on file and save accordingly

Conclusion

Hopefully this post has gone some way in expanding your knowledge and understanding of Microsoft Power Automate Desktop and its interface. What we’ve covered today was just the tip of the iceberg; there’s a lot more to automating your business processes. The main purpose of this article is for you to familiarize yourself with Microsoft Power Automate Desktop’s interface and gear yourself up for more in-depth lessons ahead!

Tags

Microsoft Power Automate Desktop, Robotic Process Automation, Console, Flow designer 

Learning resources

https://docs.microsoft.com/en-us/learn/modules/pad-first-steps/3-flow-designer-overview 

Software Version

Microsoft Power Automate Desktop 2.7.49.21099

Microsoft Power Automate desktop tutorial for beginners – Interface tour Read More »