
Microsoft Power Automate Desktop allows you to manipulate text and date time. Maintaining consistent text, numerical and date values are very important. This is especially true in some fields such as finance and logistics.
In this article, you will be learning how to use a text group of actions to manipulate your text and date time values.
All of the text group actions can be found here. When you want to perform actions with text type variables, you would need to specify the text either by entering it as input, or as a text variable. The actions store the output in a new variable.
We’ve made a video showing you all the text actions in Microsoft Power Automate Desktop, which you can see below. If you prefer to read about them, you can scroll past the video, and you’ll be able to read all about Microsoft Power Automate Desktop text actions.
https://youtu.be/VA0xZKrRpok
Table of contents
- Append line to text
- Get subtext action
- Pad text
- Trim text
- Change text case
- Create random text
- Split text
- Replace text
- Introduction to datetime actions
- Get current date and time
- Add to datetime
- Subtract dates
- Convert datetime to text
- Convert number to text
- Conclusion
Append line to text:
Firstly, we have the Append line to text action. This is to add a line of text to a single text value or list of text values. This action stores the resulting text as a new text variable. It is useful when you want to combine information into a single text or variable. For example, when you have system generated email, you might need to append(add) multiple information in the email body.

Quick tip : A quick tip for beginners is that, whenever you are unsure of what an action does, and you would like more information, you can actually hover over the (i) icon and read more. As u can see, it will be displayed in the black box to let you know more about the different parameters.

Get subtext action
Next, we have the Get subtext action. This is a very powerful action as we can extract a specific portion of a text or a list of text values. The variables produced here are stored as a text variable
- Start index: Set the start index property to retrieve text starting at a specific character position or at the start of the text.
- Length: Set the length property to end at another position or at the end of the text
- Number of chars: Number of characters to retrieve.
- Note: that the character position uses a zero-based index, which means you start counting with the first character having the index 0.

Pad text
Pad text increases the length of text to a certain value. For this, you can add whitespace, word or phrase before or after the text or list of text values. This action will add characters that are fixed by you to the text so that the final text reaches your desired length. The action stores the padded text as a new text variable.
- Pad: Option to add to left or right side of text.
- Text for padding: Character or text that will be added to lengthen the original text.
- Total length: The total character length of the final padded text. This means that the text for padding will be repeatedly added until the final text is of the specified length.

Trim text
The Trim text action allows you to remove whitespace from a text string. This includes whitespaces like space, tab, or new line. You can do so to the beginning, end or both of a text string. This is very useful, as your data might have an accidental space at the back at times and it could potentially affect the accuracy of your data. It is recommended as a best practice to use the trim text action to clean the data before performing text comparison.
- What to trim: Specify where white space characters will be removed from.

Change text case
Use the Change text case action to change the case of the text value. You can do so to a single text value or list of text values. You may change the casing of a text to uppercase, lowercase, title case or sentence case. Upper and lower are pretty straightforward. For the title case, it is for when you want every word to begin with capital letters, and for sentence case, only the first word will start with capital letters.

Quick tip: When you are more familiar with the actions and know what actions you want to deploy, an alternative way to deploy these actions will be to use the properties. So for example, you want to change the text case or trim the text. You can just click on ‘Select variable’, look for the variable you want the action to be deployed on, click on the small arrow here and you can choose from the list of properties here which the application has for text values. So you can choose from the .trim property or change text case etc.

Create random text
The Create random text action helps generate random passwords according to your preferred text length, whether or not to include uppercase and lowercase letters, digits, and symbols.

Split text
Use Split text action when you want to separate a single text value into a text list of items. Enter a value or a text variable as the input. Ideally, the text should include recognizable delimiters that separate the items. Select one of the standard delimiters or enter a custom delimiter.
- Text to split: Enter a value or a text variable as the input here (The text should include recognizable delimiters that separate the items, such as comma in the example down below. The action will split the text separated by a comma and store them into a list)
- Delimiter type: You can choose between standard or custom.
‘Is regular expression’ is used when you want to specify whether the delimiter will be a regular expression. However, this is a more advanced topic, so I will not be going through this here.

Replace text
Use the Replace text action to identify a string in a text and replace it with another string or character. You can customize the search to be case-insensitive, or to contain regular expressions. As mentioned earlier, regular expression is a more advanced topic that we will not cover here

Datetime actions
Now, onto datetime actions. You can find these actions under datetime at the actions panel.
Get current date and time
This action can be set to only get the current date or both date and time. You may also set the time zone property to the system default (which is what you have configured on your computer) or you can set a specific time zone which you will have options to choose from.


There are many properties you can choose from as well, like year, month or day. To view these properties, click on select variables (the {x} symbol), type CurrentDateTime, and click the small arrow beside CurrentDateTime, and you will see a drop-down list of all the properties for CurrentDateTime and you may choose the one you prefer.

Add to datetime
Use the add to datetime action to add a specific amount of the selected time unit to a datetime variable. It can be in seconds, minutes, hours, days, months or years. You may also just add a negative sign in front to subtract from the datetime.

Subtract dates
The subtract dates action gives you the difference between 2 datetimes. You may choose to get the difference in days, seconds, minutes or hours. And that difference will be stored as the new variable.
- From date: The datetime to subtract the first datetime from. This will be the base datetime, so generally put the later date/time in this attribute.
- Subtract date: The datetime to subtract

What’s the difference between the add to datetime action and the subtract dates action? Overall, to find out the difference between 2 datetimes, use subtract date. If you want to get the datetime after adding or subtracting a specified amount of the selected time unit to a datetime variable, use add to datetime.
Convert datetime to text
Converts a datetime value to text using a specified custom format. It has properties that contain several options regarding the format of the datetime input.
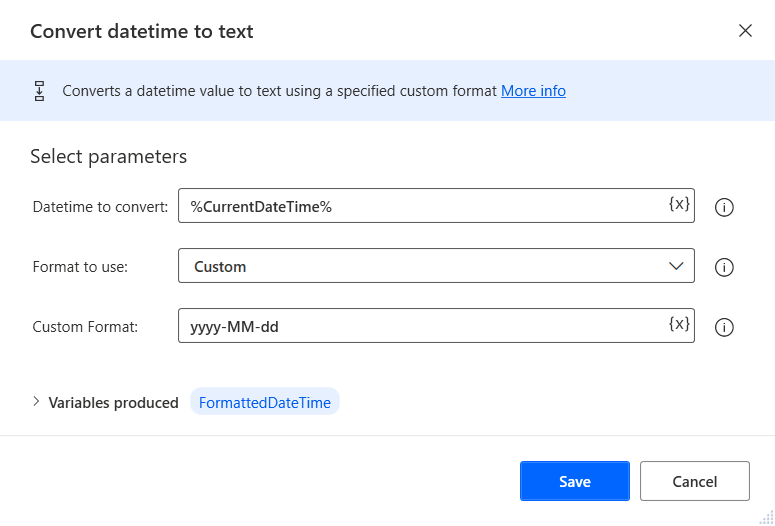
For example, convert a datetime variable that was created with the ‘Get current date and time’ action to text. Using this action, you can choose between a standard or custom format. When you choose a standard format, you have all of these options shown down below.

When you choose custom format, just ensure that your combination is in a compatible datetime format.
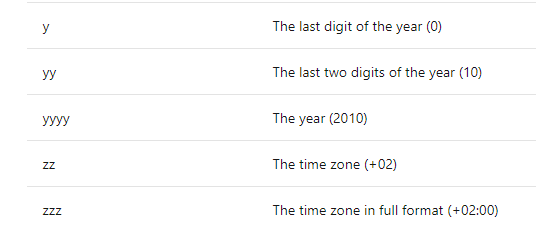
What do I mean by formats? The image below shows the various date formatting if you want a standard datetime format.

Source: https://docs.microsoft.com/en-us/learn/modules/pad-text-manipulation/2-text-actions
When you choose a custom format, you can specify the exact format you want using different combinations of the representations shown below.

Source: https://docs.microsoft.com/en-us/learn/modules/pad-text-manipulation/2-text-actions
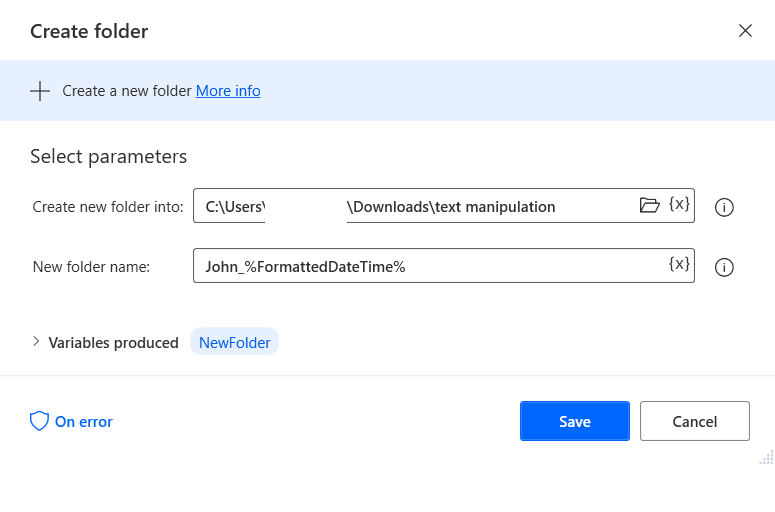
A way you can use this action is to add the new FormattedDateTime to the name of your new folders or files. This is especially useful when you generate many versions of the same files regularly, as is often the case with RPA, and you don’t want to overwrite the files.
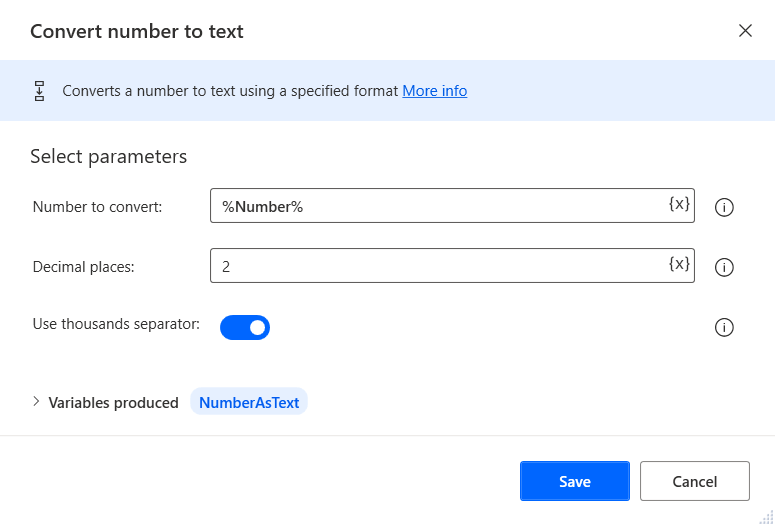
Convert number to text
The Convert number to text action is used when you want a number or a numeric variable to convert to a text variable. You will have the option to set the number of decimal places to include as well. ‘Use thousands separator’ is for you to specify whether or not to use punctuation as a thousands 1000 separator, for example expressing “1000” as “1,000”.
Conclusion
Ensuring uniform data and text formats are important in many business processes. We hope that from this article, you were able to learn all about automating text processes and data manipulation using the text and datetime actions on Microsoft Power Automate Desktop.
~~~