admin

Latest updates on Microsoft Power Automate for desktop – Aug 2022

Latest updates on Microsoft Power Automate for desktop – Aug 2022

Latest updates on Microsoft Power Automate for desktop – Aug 2022

Latest updates on Microsoft Power Automate for desktop – Aug 2022

The latest Aug 2022 update of Microsoft Power Automate for desktop has been released! Yes, in case you’ve missed the news, Power Automate Desktop has been rebranded as Power Automate for desktop. In addition, Power Automate is now built-in with Windows 11 which is generally available. Today, we are going to highlight some of these new features.

To check the software version that you have, go to the Console and click on Help, then About.

The version installed will be displayed as shown below. The latest available version (as of this writing) is 2.23.

Graphical user interface, text, application Description automatically generated

If you have an older version and would like to upgrade to the latest version to enjoy the new features, go to this link to download the software installer. For Windows 10 users, you can now also download the desktop app from the Microsoft Store.

New action Resize columns/rows in Excel worksheet

The new action “Resize columns/rows in Excel worksheet” allows you to automatically resize any rows or columns in Excel. This action is especially useful if you are writing data to the Excel file as it allows you to automate the formatting of the file and thereby enhance its readability.

Resize columns/rows in Excel worksheet

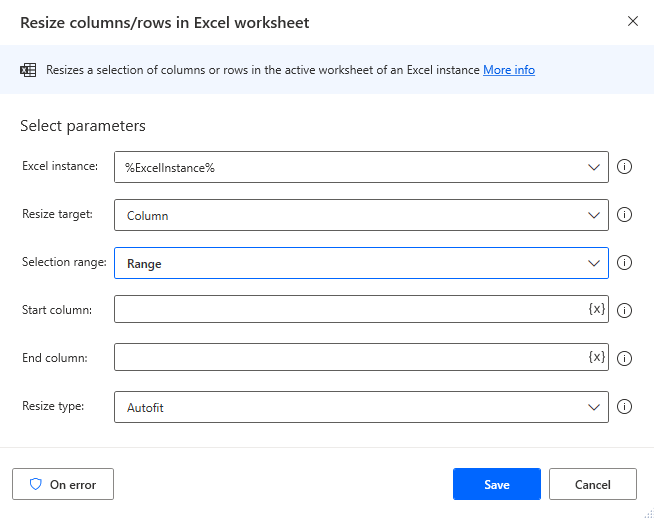
Under “Resize target” option, you can choose if you want to size the rows or columns. The option “Selection range” allows you to specify whether you want to select a specific row/column, a range of rows/columns or all available rows/columns. Finally, under “Resize type”, you can choose between autofit or specify a custom width.

New action Crop text

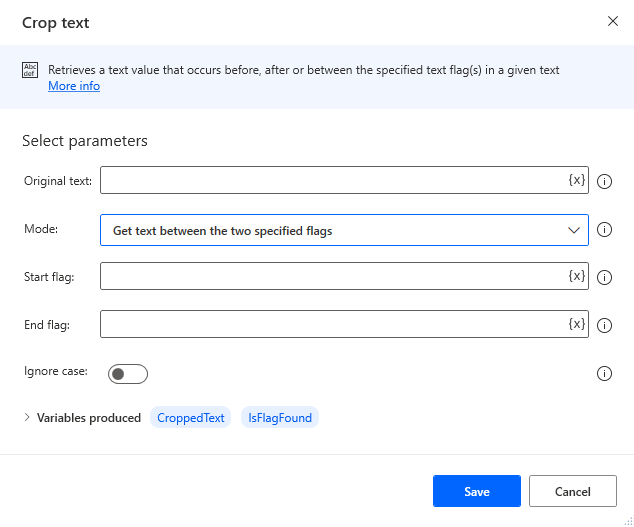
The new action “Crop text” enables you to easily extract the portion of the text that occurs before the end flag, after the start flag, or between two flags from the original text variable. The flag in this case can be any character or text. Previously, to achieve the same results, you have to reply on other actions like “Parse text” or using regular expressions.

Crop text

New SharePoint connector actions

Users of SharePoint would be happy to know that the following SharePoint connectors actions are now available in preview inside Power Automate for desktop:

  1. Update file
  2. Delete file
  3. Get file content using path
  4. Create file
  5. List folder
  6. Get file metadata using path
  7. Get folder metadata using path

This means that you are now able to automate SharePoint tasks natively using desktop flows. Previously, the SharePoint connectors are only available in cloud flows. As a result, one has to often toggle between cloud and desktop flows in order to automate a business process that requires both API and UI integration.

And the good news doesn’t stop here. According to Microsoft, more cloud connectors will be gradually introduce to the Power Automate for desktop environment, enabling you to automate more use cases faster and more easily.

Do note that you will require an Attended RPA license to access the SharePoint actions during the preview.

Conclusion

By the way, the enhancements are not stopping here. Based on the 2022 Release Wave 2 Plan for the Microsoft Power Platform (last updated on August 23, 2022), there are a number of exciting new capabilities in the roadmap, including:

  • Enroll hosted machines in Intune
  • Run hosted RPA bots
  • Set a selector based on text and use of operators
  • Use desktop flow signing
  • Enable minimal flow log details
  • More resilient UI automation in Citrix environments
  • Use credentials from Azure Key Vault in desktop flow connections
  • Improved runtime error messages for UI, Web, Excel, and mouse and keyboard actions
  • Troubleshooter for connectivity issues in Power Automate for desktop
  • View desktop flow properties in Power Automate for desktop console
  • Generate reliable selectors of UI elements
  • Share flows from within Power Automate for desktop
  • Use web automation to access cross-domain iFrames
  • Use SharePoint Connector in Power Automate for desktop

Now that you have learnt some of the new features and enhancements made in Aug 2022, why not download this latest version of Microsoft Power Automate for desktop and starting automating?

~~~

Learning Resources

https://powerautomate.microsoft.com/en-us/blog/power-automate-for-desktop-august-2022-update/

Previous Updates

May 2022

Apr 2022

Mar 2022

Feb 2022

Jan 2022

Dec 2021

Oct 2021

Sep 2021

Aug 2021

July 2021

June 2021

May 2021

April 2021

Latest updates on Microsoft Power Automate for desktop – Aug 2022 Read More »

Latest updates on Microsoft Power Automate for desktop – May 2022

Latest updates on Microsoft Power Automate for desktop – May 2022

Latest updates on Microsoft Power Automate for desktop – May 2022

The latest May 2022 update of Microsoft Power Automate for desktop has been released! Yes, in case you’ve missed the news, Power Automate Desktop has been rebranded as Power Automate for desktop. In addition, Power Automate is now built-in with Windows 11 which is generally available. Today, we are going to highlight some of these new features.

To check the software version that you have, go to the Console and click on Help, then About.

Checking for Microsoft Power Automate for Desktop version

The version installed will be displayed as shown below. The latest available version (as of this writing) is 2.20.132.22123.

The Microsoft Power Automate for Desktop version running currently

If you have an older version and would like to upgrade to the latest version to enjoy the new features, go to this link to download the software installer. For Windows 10 users, you can now also download the desktop app from the Microsoft Store.

Action Click link on web page is enhanced to support all click types

The action Click link on web page is now enhanced with an additional parameter Click type. With this option, all types of mouse clicks are now supported.

Action Click link on web page is enhanced to support all click types

Do note that it is recommended to enable the Send physical click option (found under Advanced) for all click types except left click.

Send physical click when clicking link on web page

Enhancement of browser automation actions to support a timeout value

A new parameter Wait for page to load has been added to some browser automation actions, including Focus text field on web page, Populate text field on web page, Set check box state on web page, Select radio button on web page, Set drop-down list value on web page and Press button on web page.

Enhancement of browser automation actions to support a timeout value

When enabled, user can specify the timeout value in the parameter Timeout on webpage load. The default value for this is 60 seconds.

Action Extract text from PDF is enhanced to support structured data

A new parameter Optimize for structured data has been added to the action Extract text from PDF. When enabled, Microsoft Power Automate for desktop will detect the formatted layout in the PDF document and extract the text accordingly, all the while maintaining the structure of the tabular data.

Action Extract text from PDF is enhanced to support structured data

Conclusion

By the way, the enhancements are not stopping here. Based on the 2021 Release Wave 2 Plan for the Microsoft Power Platform (last updated on November 24, 2021), there are a number of exciting new capabilities in the roadmap, including:

  • Automatically scale virtual machine deployments by leveraging Azure Virtual Desktop (AVD) integration to run desktop flows
  • Availability of Power Automate for desktop to users of the new Windows 11 by default
  • Save an Excel workbook as XML (.xml) file
  • Mark variables as sensitive in Power Automate for desktop to mask data
  • Users with accounts belonging to multiple tenants can switch between tenants within the Power Automate for desktop application itself
  • Highlighting syntax within the script editor in Power Automate for desktop designer
  • Unified web and desktop recorder for recording both their web- and desktop-related activities during a single recording session
  • Support UI automation in Citrix environments for better reliability and resilience
  • Create custom dialog action in Power Automate for desktop
  • Create data loss prevention policies to govern desktop flows

Now that you have learnt some of the new features and enhancements made in May 2022, why not download this latest version of Microsoft Power Automate for desktop and starting automating?

Learning Resources

https://powerautomate.microsoft.com/en-us/blog/power-automate-for-desktop-may-2022-update

Previous Updates

Apr 2022

Mar 2022

Feb 2022

Jan 2022

Dec 2021

Oct 2021

Sep 2021

Aug 2021

July 2021 

June 2021

May 2021

April 2021

Latest updates on Microsoft Power Automate for desktop – May 2022 Read More »

Latest updates on Microsoft Power Automate for desktop – Apr 2022

Latest updates on Microsoft Power Automate for desktop – Apr 2022

Latest Updates on Microsoft Power Automate for Desktop – Apr 2022

The latest Apr 2022 update of Microsoft Power Automate for desktop has been released! Yes, in case you’ve missed the news, Power Automate Desktop has been rebranded as Power Automate for desktop. In addition, Power Automate is now built-in with Windows 11 which is generally available. Today, we are going to highlight some of these new features.

To check the software version that you have, go to the Console and click on Help, then About.

Checking for Microsoft Power Automate for Desktop version

The version installed will be displayed as shown below. The latest available version (as of this writing) is 2.19.139.22098.

The Microsoft Power Automate for Desktop version running currently

If you have an older version and would like to upgrade to the latest version to enjoy the new features, go to this link to download the software installer. For Windows 10 users, you can now also download the desktop app from the Microsoft Store.

Built-in examples of desktop flows

When you install Microsoft Power Automate for desktop, you will find an additional Examples tab in the console. There, you can explore some sample desktop flows across the categories of Excel, Web and Desktop automation.

Built-in examples of desktop flows

For example, for Excel automation, there are several flows of varying levels of difficulties – beginner, intermediate and advanced. By exploring these sample flows, you can learn and understand how to perform various Excel actions, including launching excel and extracting a table, consolidating Excel reports and manipulating Excel using SQL.

Built-in examples of Excel automation

Support for users belonging to more than one cloud or region

During the sign-in process, users belonging to more than one cloud or region is now able to select the region they want to connect to. To enable this, administrators will need to set the following registry key:

Registry key to support users belonging to more than one cloud or region

The supported values are:

  • 0 – The user will have the option to select the region of their preference to connect to through an additional option in the sign in screen.
  • 1 – The user will be automatically connected to the first available region they are registered to.
  • 2 – The user will connect to the global public region.
  • 3 – The user will connect to the US Government GCC region.
  • 4 – The user will connect to the US Government GCC High region.
  • 5 – The user will connect to the US Government DoD region.
  • 6 – The user will connect to the China (operated by 21Vianet) region.

New action Hover mouse over UI element in window

The new action Hover mouse over UI element in window allows the user to move the mouse pointer over the specified UI element in a window, but without performing any mouse clicks. This action is very useful for accessing the additional interaction options that are only enabled when you hover over the UI element itself.

New action Hover mouse over UI element in window

Enhancement of action Populate text field on web page to support physical keystrokes

The action Populate text field on web page is now enhanced with an additional Advanced parameter – Populate test using physical keystrokes. When enabled, Power Automate for desktop will populate the text field by imitating the user’s keystrokes on a keyboard instead of sending text using JavaScript. Enable this option if you find that using JavaScript does not produce the intended effects on the required fields. As an added benefit, this action will also bring the browser window to the foreground.

Enhancement of action Populate text field on web page to support physical keystrokes

Improved Recorder performance

The Recorder performance has been enhanced by making the tracking of elements during the recording session faster and more accurate. However, do note that the Recorder no longer generates the action Drag and drop UI element in window (though you can still manually add this action to your flow after the recording.)

Conclusion

By the way, the enhancements are not stopping here. Based on the 2021 Release Wave 2 Plan for the Microsoft Power Platform (last updated on November 24, 2021), there are a number of exciting new capabilities in the roadmap, including:

  • Automatically scale virtual machine deployments by leveraging Azure Virtual Desktop (AVD) integration to run desktop flows
  • Availability of Power Automate for desktop to users of the new Windows 11 by default
  • Save an Excel workbook as XML (.xml) file
  • Mark variables as sensitive in Power Automate for desktop to mask data
  • Users with accounts belonging to multiple tenants can switch between tenants within the Power Automate for desktop application itself
  • Highlighting syntax within the script editor in Power Automate for desktop designer
  • Unified web and desktop recorder for recording both their web- and desktop-related activities during a single recording session
  • Support UI automation in Citrix environments for better reliability and resilience
  • Create custom dialog action in Power Automate for desktop
  • Create data loss prevention policies to govern desktop flows

Now that you have learnt some of the new features and enhancements made in Apr 2022, why not download this latest version of Microsoft Power Automate for desktop and starting automating?

Learning Resources

https://powerautomate.microsoft.com/en-us/blog/power-automate-for-desktop-april-2022-update/

Previous Updates

Mar 2022

Feb 2022

Jan 2022

Dec 2021

Oct 2021

Sep 2021

Aug 2021

July 2021

Jun 2021

May 2021

April 2021

Latest updates on Microsoft Power Automate for desktop – Apr 2022 Read More »

Latest updates on Microsoft Power Automate for desktop – Mar 2022

Latest Updates on Microsoft Power Automate for Desktop – Mar 2022

The latest Mar 2022 update of Microsoft Power Automate for desktop has been released! Yes, in case you’ve missed the news, Power Automate Desktop has been rebranded as Power Automate for desktop. In addition, Power Automate is now built-in with Windows 11 which is generally available. Today, we are going to highlight some of these new features.

Here are the new features we’ll be covering:

To check the software version that you have, go to the Console and click on Help, then About.

Checking for Microsoft Power Automate for Desktop version

The version installed will be displayed as shown below. The latest available version (as of this writing) is 2.18.146.22083.

The Microsoft Power Automate for Desktop version running currently

If you have an older version and would like to upgrade to the latest version to enjoy the new features, go to this link to download the software installer. For Windows 10 users, you can now also download the desktop app from the Microsoft Store.

Enhanced Extract data from web page action to support extracting large datasets

The Extract data from web page action has been enhanced to better support the extraction of large datasets. 2 new parameters have been added:

  1. Process data upon extraction – Specifies whether to process the extracted data to present them exactly as displayed on the web page. Examples of data processing include displaying information nested in HTML iframes and filtering through hidden or visible elements. For large datasets, it is not recommended to enable this option due to the extended extraction time.
  2. Timeout – Specifies the time in second to wait for the action to complete before it fails.

The enhanced extract data from web page action in Microsoft Power Automate for Desktop

Enhanced Click link on web page action to support physical movement of the mouse cursor

A new parameter has been added to the Click link on web page action called Send physical click. When enabled, the web browser instance will be brought to the foreground, and the mouse cursor will move physically over the UI element before performing the click. Try enabling this option in cases where you find the emulated click not working as intended.

The enhanced click link on web page action in Microsoft Power Automate for Desktop

Support of Internet Explorer mode in Microsoft Edge browser

As some of you might be aware, Internet Explorer 11 is reaching End of Life on Jun 15, 2022. However, for legacy websites that still requires the Internet Explorer for backward compatibility, Microsoft Edge actually supports the IE mode which allows you to load websites in Internet Explorer mode while using the Edge browser.

And with this latest release of the Microsoft Power Automate for desktop, you can now perform web automation actions of web pages that are opened in IE mode.

User notification when trying to interact with applications that are running with elevated rights

Power Automate for desktop will not be able to interact with applications that are being run as administrator unless it is also being run with elevated rights. When this scenario arises, users will now be informed that the UI elements cannot be accessed, and that the recommended action is to restart Power Automate for desktop as an administrator.

User notification of UI elements that cannot be accessed in Microsoft Power Automate for Desktop

Automated updates of Java automation files

A new service has been added which will automatically check the machine’s Java installation folders and ensures all the necessary Java automation files have been installed. Hence, users will no longer need to manually update these Java files.

Conclusion

By the way, the enhancements are not stopping here. Based on the 2021 Release Wave 2 Plan for the Microsoft Power Platform (last updated on November 24, 2021), there are a number of exciting new capabilities in the roadmap, including:

  • Automatically scale virtual machine deployments by leveraging Azure Virtual Desktop (AVD) integration to run desktop flows
  • Availability of Power Automate for desktop to users of the new Windows 11 by default
  • Save an Excel workbook as XML (.xml) file
  • Mark variables as sensitive in Power Automate for desktop to mask data
  • Users with accounts belonging to multiple tenants can switch between tenants within the Power Automate for desktop application itself
  • Highlighting syntax within the script editor in Power Automate for desktop designer
  • Unified web and desktop recorder for recording both their web- and desktop-related activities during a single recording session
  • Support UI automation in Citrix environments for better reliability and resilience
  • Create custom dialog action in Power Automate for desktop
  • Create data loss prevention policies to govern desktop flows

Now that you have learnt some of the new features and enhancements made in Mar 2022, why not download this latest version of Microsoft Power Automate for desktop and starting automating?

Learning Resources

https://powerautomate.microsoft.com/en-us/blog/power-automate-for-desktop-march-2022-update/

Previous Updates

Feb 2022

Jan 2022

Dec 2021

Oct 2021

Sep 2021

Aug 2021

July 2021

June 2021

Latest updates on Microsoft Power Automate for desktop – Mar 2022 Read More »

Microsoft Power Automate for Desktop Feb 2022 update

Latest Update on Microsoft Power Automate for Desktop – February 2022

Microsoft Power Automate for Desktop Feb 2022 update

The latest Feb 2022 update of Microsoft Power Automate for desktop has been released! Yes, in case you’ve missed the news, Power Automate Desktop has been rebranded as Power Automate for desktop. In addition, Power Automate is now built-in with Windows 11 which is generally available. Today, we are going to highlight some of these new features.

To check the software version that you have, go to the Console and click on Help, then About.

Checking your version of Microsoft Power Automate for Desktop by going to Help >About

The version installed will be displayed as shown below. The latest available version (as of this writing) is 2.17.169.22042.

The dialog box showing your version of Microsoft Power Automate for Desktop

If you have an older version and would like to upgrade to the latest version to enjoy the new features, go to this link to download the software installer. For Windows 10 users, you can now also download the desktop app from the Microsoft Store.

Here are the Microsoft Power Automate for Desktop features in this February 2022 update:


Flow monitoring notification window for attended desktop flow runs

When the attended desktop flow run is triggered from the console, there is now an option to display the built-in flow monitoring notification window.

The new flow monitoring notification window in Microsoft Power Automate for Desktop

With this notification window, you can:

  • Pause or stop the desktop flow run;
  • View the current status and duration of the desktop flow run, as well as the name of the desktop flow, the name of the current subflow, and the name and number of the current action; and
  • Minimize or move the notification window around.

To turn on this notification window, go to Settings in the console. Under Monitoring / Notifications, select either Windows notifications or Flow monitoring window (recommended) and click the Save button.

Turning on the flow monitoring notification in Microsoft Power Automate for Desktop through Settings > General - Monitoring / Notifications

Performance enhancements in flow designer

You would have noticed that the flow designer runs much faster in this release. That’s because of the multiple performance fixes deployed, specifically to improve the speed of:

  • Adding, deleting, editing or moving an action inside the Main flow or any other subflows;
  • Navigating from one subflow to another;
  • Saving the desktop flow; and
  • Enabling and disabling actions.

Display custom form action (Preview)

With the new Display custom form action, you can now create your own user dialog based on the Adaptive Cards technology. This action comes with a Custom form designer that is both intuitive and easy to use. By combining different input elements, controls and actions, the designer lets you create a custom data input window to be prompted to the user when the flow runs. In turn, this allows for a richer, more interactive experience with the user.

The new custom form designer in Microsoft Power Automate for Desktop

Convert file to Base64 (and vice versa) actions – New!

The new Convert file to Base64 action allows you to convert a file to a Base64 encoded string representation, which is often the format used for performing file transfer over the internet or when using API. Likewise, the Convert Base64 to file action converts the Base64 encoded string to a file which you can then save to the desired destination.

The Convert Base64 to file dialog box in Microsoft Power Automate for Desktop

Extract tables from PDF action – New!

The new Extract tables from PDF action is a powerful new feature that allows you to easily extract structured data tables from a PDF document. You have the option to specify which page(s) you wish to perform the extraction, as well as the ability to merge tables that span across multiple pages.

The new action extract tables from PDF in Microsoft Power Automate for Desktop

The output of this action is a list variable containing all the extracted PDF tables.

The results of the extract table from PDF action in Microsoft Power Automate for Desktop

New property for datatable variables

In every datatable variable, there is now a new property of datarow type called ColumnHeadersRow, which holds the column names of the said table. This will enable writing these column headers in a row (e.g. in Excel) in an easy and straightforward way.

Renaming input/output variables to existing names is now permitted

With this release, you can now create a new input/output variable using an existing flow variable name. Do note that doing so with merge the two variables into one.

Graphical user interface, text, application Description automatically generated

Copy and paste a subflow into other desktop flows

You can now easily copy a subflow and paste it into any desktop flows.

Copy a subflow and paste it into any desktop flows in Microsoft Power Automate for Desktop

Copy a subflow and paste it into any desktop flows in Microsoft Power Automate for Desktop

Auto clean-up of local actions log file

The actions log file, which can be found in the user’s local app data folder (C:\Users\\AppData\ Local\Microsoft\Power Automate Desktop), will now be auto deleted upon the completion of a flow run. For users who prefer to keep these files, there is an option of setting a registry key that will disable this auto clean-up.

Conclusion

The enhancements are not stopping here. Based on the 2021 Release Wave 2 Plan for the Microsoft Power Platform (last updated on November 24, 2021), there are a number of exciting new capabilities in the roadmap, including:

  • Automatically scale virtual machine deployments by leveraging Azure Virtual Desktop (AVD) integration to run desktop flows
  • Availability of Power Automate for desktop to users of the new Windows 11 by default
  • Save an Excel workbook as XML (.xml) file
  • Mark variables as sensitive in Power Automate for desktop to mask data
  • Users with accounts belonging to multiple tenants can switch between tenants within the Power Automate for desktop application itself
  • Highlighting syntax within the script editor in Power Automate for desktop designer
  • Unified web and desktop recorder for recording both their web- and desktop-related activities during a single recording session
  • Support UI automation in Citrix environments for better reliability and resilience
  • Create custom dialog action in Power Automate for desktop
  • Create data loss prevention policies to govern desktop flows

Now that you have learnt some of the new features and enhancements made in Feb 2022, why not download this latest version of Microsoft Power Automate for desktop and starting automating?

Learning Resources

https://powerautomate.microsoft.com/en-us/blog/power-automate-for-desktop-february-2022-update/

Previous Updates

Jan 2022

Dec 2021

Oct 2021

Sep 2021

Aug 2021

July 2021

June 2021

May 2021

Latest Update on Microsoft Power Automate for Desktop – February 2022 Read More »

How to loop through each row in Excel in Microsoft Power Automate for Desktop

How to loop through each row in an Excel file in Microsoft Power Automate for Desktop

Graphical user interface, application, table, Excel Description automatically generated

Do you have trouble looping through rows in Excel in Microsoft Power Automate for Desktop? Fret not! This is a common struggle, and we’ll help you learn how to do it.

With Microsoft Excel being so pervasive in our work and/or school lives, automating repetitive tasks in Excel is one of the most useful ways for everyday users to make their lives easier using Microsoft Power Automate for Desktop. But looking through the myriad Microsoft Power Automate for Desktop actions, it may not be obvious how to make them repeat (loop) for each row in Excel.

Today, we will be walking you through how to loop through each row in Excel, using two different methods.

We will be using the following Excel file to demonstrate both methods. There are 10 rows of data in this Excel file, and both solutions will teach you how to loop through each row and retrieve the individual values.

Excel data that will be used to demonstrate how to loop through rows of Excel in Microsoft Power Automate for Desktop

Method 1: Looping through Excel data, retrieving the value of a single cell each time

Firstly, assuming the Excel file is already open, in your flow designer, add the “Attach to running Excel” action to your flow and select your desired Excel file.

The Attach to running Excel action in Microsoft Power Automate for Desktop

However, if the Excel file is not open, use the “Launch Excel” action instead.

If your Excel file is not already open, using the action Launch Excel intead

Next we will need to use the Loop action. A loop is a concept in Microsoft Power Automate for Desktop that allows you to repeat one or more actions multiple times. Through the loop action, you are able to specify the number of times you want an action to be repeated. In this case, as there are 10 rows of data, we would need to repeat the loop 10 times. In the Loop dialogue box, set the “Start from” parameter as 2. The 2 corresponds to the second row in the Excel file, which contains the first row of data.

Row number 2 in the Excel file corresponds to the first row of data

Set the “End to” parameter as 11 – which corresponds to the last row in the Excel file which contains data. The loop index will increment by a value of 1 as we want to loop through each row.

Setting parameters for the Loop action in Microsoft Power Automate for Desktop

Next, as we want the flow to read from the Excel file, we will select the “Read from Excel worksheet” action. In this case we want choose the option under “Retrieve” to retrieve the value of a single cell.

Configuring the Read from Excel worksheet action in Microsoft Power Automate for Desktop

To obtain the data from the first row and first column, set the Start column as “1” or “A” which would correspond to the column “First Name” in the Excel file. As for “Start row”, it is vital to note that the start row is not “2” but is %LoopIndex%. This is important because as we go through each iteration of the loop, the row changes from 2 to 11.

Configuring the Read from Excel worksheet action in Microsoft Power Automate for Desktop

The variable produced should be changed to %FirstName% in order to make it more intuitive.

Renaming the Variable produced as a best practice

Repeat this for all other columns as needed.

Method 2: Looping through Excel data using a datatable (retrieve values from a range of cells)

For this method, we will be using a concept called datatable. A datatable is a variable that stores data in the tabular form – similar to how you would store data using an Excel file.

Step 1: Read from Excel file and store the values as a datatable

Firstly, in the “Read from Excel worksheet” action, set the Retrieve parameter as “Values from a range of cells”. Next, set the Start column, Start row, End column, End row, according to your Excel file. In this case it is “A”, “1”, “G”, “11”, respectively.

Configuring the Read from Excel worksheet action in Microsoft Power Automate for Desktop to retrieve the values from a range of cells

Next, under “Advanced” turn on “First line of range contains column names”.

Turning on

After running this flow and clicking on “ExcelData” in the flow variables pane, you can see that the flow has extracted all the values from the Excel file and stored them as the variable “ExcelData” which is a datatable.

The resulting datatable after running the flow in Microsoft Power Automate for Desktop

Important Note: Datatables use a zero-based index. This means that the first row and column in the datatable have an index of 0 and not 1. So remember to use a zero-based index while retrieving data.

Zero-based index in Microsoft Power Automate for Desktop datatables

Zero-based index in Microsoft Power Automate for Desktop datatables also applies to columns

Step 2: Retrieve the values you need using for each loop

We will be using a for each loop, which is particularly useful while iterating over a datatable or list. In the for each loop, we need to specifiy the data table we wish to iterate over – in this case, it is “ExcelData”. The each of the loop, it will store the data under the variable called “CurrentItem”. The variable “CurrentItem” is a datarow containing all the values in that row.

Using for each loop to loop through the datatable obtained from the Excel file and retrieve the values


Work with Excel data in Microsoft Power Automate for Desktop now

So we’ve shown you how to loop through each row in Excel in Microsoft Power Automate for Desktop. Knowing how to do this step is crucial in making full use of the Excel actions in Microsoft Power Automate for Desktop. Now that you know how to do it, it’s time for you to try it out! 

How to loop through each row in an Excel file in Microsoft Power Automate for Desktop Read More »

Merge & Split PDF Files in Microsoft Power Automate for Desktop

How to Merge and Split PDF Files in Microsoft Power Automate for Desktop

Logo, company name Description automatically generated

Have you ever struggled to merge and split PDF files? In this article we will show you how to easily do so using Microsoft Power Automate for Desktop!

Why might you need to merge or split PDF files?

Maybe you have separate documents from different co-workers that need to be consolidated into one document for reporting or filing purposes. Or maybe you have scanned a big bunch of documents together, but they need to be separate documents.

There are many more reasons you may need to merge/split PDF files, and Microsoft Power Automate for Desktop can help you automate the process.

For those of you who prefer video instructions, you can have a look at the video below. If you prefer to read, just scroll down further for the article.

Skip ahead to the instructions you need:

  1. How to merge PDF files in Microsoft Power Automate for Desktop
  2. How to split PDF files in Microsoft Power Automate for Desktop
  3. How to split PDF files in Microsoft Power Automate for Desktop (unknown number of pages)

How to merge PDF files in Microsoft Power Automate for Desktop

For the merging files portion of the article, we will be using a folder which contains five individual PDF files as an example.

Folder containing PDF files to be merged using Microsoft Power Automate for Desktop

Firstly, we need to use the action “Get files in folders”. Under the “Folder” parameter, choose the right folder from the dropdown menu – in our case, it is the “merge PDF” folder. This action will retrieve all the files in this folder and store it inside a variable called Files which is essentially a list of file objects.

The Get files in folder action in Microsoft Power Automate for Desktop

Next, we will drag and drop the “Merge PDF Files” action, which can be found under PDF actions, into the main workspace. The input parameter in this case would be the “Files” variable

Where to find the Merge PDF files action in Microsoft Power Automate for Desktop

The merge PDF files action in Microsoft Power Automate for Desktop, and the options available

For the “Merged PDF path”, navigate to your desired folder – in our case here, it is the “Merge PDF” folder, and rename the file as “Merged PDF.pdf”. Remember to specify the .pdf extension.

Naming the merged file output

Next, just to be safe, select the “Overwrite” option for “If file exists”.

The Merge PDF files action in Microsoft Power Automate for Desktop, with Merged PDF path entered

Run the flow. Navigating back to your folder, will show that a merged file containing all five individual PDFs has been successfully created!

The resulting merged file found in the folder after running the flow in Microsoft Power Automate for Desktop

How to split PDF files in Microsoft Power Automate for Desktop

To explain splitting PDF files, we will be using a single PDF titled “Sample PDF File”, containing five individual pages.

The folder containing the Sample PDF file.pdf that will be split using Microsoft Power Automate for Desktop

Step 1: Extract PDF file page

Firstly, we will be using the “Extract PDF files pages to new PDF file” action. Under the “PDF file” parameter, specify the PDF file you wish to extract the pages from, and set the “Page selection” as the page you want to extract. For extracted PDF file path, extract the page into a separate PDF file and in this case we have renamed it as “Page 1.pdf”. Remember to always add the file extension .pdf.

Where to find the Extract PDF file pages to new PDF file action in Microsoft Power Automate for Desktop

Naming the resulting extracted PDF file including the .pdf extension

Lastly, select “Overwrite” from the “If file exists” dropdown menu.

The Extract PDF file pages to new PDF file action with the right options selected

After running the flow and navigating to our folder, we can see that we have successfully extracted the first page into a separate pdf file called page1.pdf

The resulting file in the folder after running the flow in Microsoft Power Automate for Desktop

Step 2: Implement a loop to repeat for other pages

Firstly, drag the “Loop” action into the workspace. Since we know there are 5 individual pages, we will set the “Start from” as 1, the “End to” as 5, and the “Increment by” as 1.

Setting up a loop in Microsoft Power Automate for Desktop to repeat the split PDF action steps described previously.

Then, drag your PDF action into the body of your loop. It should look like this:

The Extract PDF file action in the loop we set up in the previous step.

Remove the “Page selection” value which was hardcoded earlier, click on the {x} and choose “LoopIndex” from the dropdown menu.

Extract PDF files action

Changing the page selection option of the Extract PDF files action to %LoopIndex%

Likewise, do the same for the extracted pdf file path instead of hard coding the value to be “Page 1”, we shall use the dynamic value “LoopIndex” instead.

Choosing the %LoopIndex% variable for the extracted PDF file path

Changing the extracted PDF file path of the Extract PDF files action to Page %LoopIndex%.pdf

What this does is loop through the pdf file five times. The starting loop index is 1 and for the first loop we will extract the first page of the pdf file into a new pdf file called “Page 1.pdf” (i.e. Page %LoopIndex%.pdf, where LoopIndex is 1). For the second iteration, the loop index becomes the value of 2 and for this iteration will not extract the first page but will extract the second page and save the second page into a new file called “Page 2.pdf”. This continues so on and so forth until five iterations of the loop have been completed.

Running this flow, will cause the LoopIndex to increment from 1 to 5, and each page has been successfully extracted into five individual PDF files!

How the correct loop set up looks

The resulting split PDF files after successfully running the flow in Microsoft Power Automate for Desktop

However, it is important to note that we coded the loop to increase from 1 to 5 because we knew beforehand that the total pdf files file contains 5 pages. There would be a few change and additional steps to the flow in the scenario where we aren’t aware of how many pages the PDF file contains.

How to split PDF files when number of pages is unknown

We would need to change the “End to” in the Loop dialogue box to an arbitrary large number. In this case, we have set it as 100.

Changing the

We will need to create a label, using the “label” action under “Flow control”. Drag and drop the label to the end of the loop on your workspace.

Where to find the Label action in Microsoft Power Automate for Desktop

Name the label as “OutofBoundsError”.

Naming the label

Click on your “Extract PDF file pages into new PDF file” action, and the “On error” option.

Clicking on the

Under “On error”, choose the option “Continue flow run”, and “Go to label”. Select label as the “OutOfBoundsError”. Click save.

Selecting

Selecting the OutOfBoundsError label

What this does is: Initially we have increased the end loop index to 100, although our PDF file contains only 5 pages. Hence when the loop index reaches the value of 6, which is when it tries to extract page 6 of the PDF file, it will encounter an error as page 6 does not exist. The exception handling has been configured in such a way that when an error is occurred, the flow will jump to the “OutOfBoundsError” label, hence exiting the loop.

Graphical user interface, text, application Description automatically generated

Graphical user interface, text, application Description automatically generated

Now you have successfully managed to split a PDF into individual PDF pages, without hardcoding the number of pages in the PDF!

Automate splitting and merging PDF files in Microsoft Power Automate for Desktop

Now that you’ve learned how to use Microsoft Power Automate for Desktop to automatically split or merge PDF files, it’s time you integrate it into your daily work. We hope you’ve found our tips useful in helping you become more productive.

How to Merge and Split PDF Files in Microsoft Power Automate for Desktop Read More »

Latest Updates on Microsoft Power Automate for Desktop – January 2022

Latest Updates on Microsoft Power Automate for Desktop – Jan 2022

Latest Updates on Microsoft Power Automate for Desktop – January 2022

Happy New Year everyone!

The latest Jan 2022 update of Microsoft Power Automate for desktop has been released! Yes, in case you’ve missed the news, Power Automate Desktop has been rebranded as Power Automate for desktop. In addition, Power Automate is now built-in with Windows 11 which is generally available. Today, we are going to highlight some of these new features.

To check the software version that you have, go to the Console and click on Help, then About.

Checking your version of Microsoft Power Automate for Desktop

The version installed will be displayed as shown below. The latest available version (as of this writing) is 2.16.215.22020.

Display of the version of Microsoft Power Automate for Desktop that is installed on your device

If you have an older version and would like to upgrade to the latest version to enjoy the new features, go to this link to download the software installer. For Windows 10 users, you can now also download the desktop app from the Microsoft Store.

Nesting of multiple Excel instances under a single Excel process

Previously, in the Launch Excel action, each Excel instance can only be launched under an isolated Excel process, thus limiting the add-ins and macros which are accessible.

In this latest release, users are now able to nest multiple Excel instances under a single Excel process, as well as to load the accompanying add-ins and macros. In this way, these nested Excel instances will be able to reference other add-ins and macros which are previously not available.

Microsoft Power Automate for Desktop update: Nest multiple Excel instances under a single Excel process

Conclusion

By the way, the enhancements are not stopping here. Based on the 2021 Release Wave 2 Plan for the Microsoft Power Platform (last updated on November 24, 2021), there are a number of exciting new capabilities in the roadmap, including:

  • Automatically scale virtual machine deployments by leveraging Azure Virtual Desktop (AVD) integration to run desktop flows
  • Availability of Power Automate for desktop to users of the new Windows 11 by default
  • Save an Excel workbook as XML (.xml) file
  • Mark variables as sensitive in Power Automate for desktop to mask data
  • Users with accounts belonging to multiple tenants can switch between tenants within the Power Automate for desktop application itself
  • Highlighting syntax within the script editor in Power Automate for desktop designer
  • Unified web and desktop recorder for recording both their web- and desktop-related activities during a single recording session
  • Support UI automation in Citrix environments for better reliability and resilience
  • Create custom dialog action in Power Automate for desktop
  • Create data loss prevention policies to govern desktop flows

Now that you have learnt some of the new features and enhancements made in Jan 2022, why not download this latest version of Microsoft Power Automate for desktop and starting automating?

Learning Resources

https://powerautomate.microsoft.com/en-us/blog/power-automate-for-desktop-january-2022-update/

Previous Updates

Dec 2021

Oct 2021

Sep 2021

Aug 2021

July 2021

June 2021

May 2021

April 2021

Latest Updates on Microsoft Power Automate for Desktop – Jan 2022 Read More »

Get insights with Microsoft Power Automate's Process Advisor

Discover Optimisation and Automation Opportunities with Microsoft Power Automate’s Process Advisor

Get insights with Microsoft Power Automate's Process Advisor

Power Automate’s Process Advisor is a useful tool that takes the guesswork out of your automation.

You’ll have better ideas of where the bottlenecks are so you can drive improvements in the right places.

Analysis insights from the Process Advisor can also give you the information you need to prioritise your automation efforts.

In this article, we will learn how to generate these insights  with Process Advisor in Microsoft Power Automate.

What is Process Advisor?

Process Advisor records and analyses manual business tasks. It discovers inefficiencies and provides optimisation and automation opportunities. Process Advisor also automatically produces a process map that visualises the process which you can use to drive improvement in your business!

This article will cover two methods to get you started analysing your processes:

  1. Import an existing solution that includes Process Advisor recordings
  2. Create your own Process Advisor recording

For those of you who prefer to watch the video, you can have a look at the video below. If you prefer to read, just scroll down further for the article.


Method #1 Import an existing solution

Firstly, begin by logging into the Power Automate web portal (https://flow.microsoft.com) and selecting “Solutions” on the sidebar to the left.

Here, you can choose to import an existing solution.

The

Importing a solution in the Microsoft Power Automate web portal

You might encounter an error as shown below:

The error that you may encounter after importing your solution

If you do encounter the error, refreshing the page will allow the Test Solution to be uploaded successfully.

After refreshing the page, the

Clicking on your desired solution will show all the flows under it. In this case, the RPA in a Day Process Advisor has numerous desktop flows, inferred tasks and PM Recordings from different users.

Graphical user interface, text, application, email, website Description automatically generated

Graphical user interface, text, email, website Description automatically generated

You can also view these recordings by going to the sidebar and clicking Process Advisor > Processes.

A screenshot of a computer Description automatically generated

Opening one of the recordings will show the various steps under the flow.

Graphical user interface, application, Teams Description automatically generated

In order to Analyse the recording, click on the “Analyze” tab.

A screenshot of a computer Description automatically generated

Then select the “Analytics” tab.

A screenshot of a computer Description automatically generated

The Analytics tab reveals various details of the process – the process map, number of recordings used for the analysis, the average time taken for the whole process, and much more.

The process map on the right-hand side makes it possible to visualise and analyse the process by looking at the graphical representation of how your business process are performing. Any differences/discrepancies in the steps taken to complete the process will also show up, as well as the time taken for each step to be completed.

Graphical user interface Description automatically generated with low confidence

If you go to the “Application” tab, you can see details on which applications are involved in the process, and how much they contribute to the proces. In this case, through the two pie charts we can see that legacyinvoiceapp and outlook have significant contributions to the Time Spent and Actions by Applications.

Graphical user interface, application Description automatically generated

Method #2 Create your own solution

To create your own recording, go to the side bar, click on “Process advisor”, followed by “Processes” below it.

Graphical user interface, text, application, Word Description automatically generated

Graphical user interface, text, application, Word Description automatically generated

Click “New Process” (top left-hand corner), set your process name, select Recordings and click Create.

Graphical user interface, application Description automatically generated

Click “add a recording”.

Graphical user interface, application Description automatically generated

After selecting Add recording, you will be prompted to open Power Automate Desktop. Click on “Open Power Automate Desktop”

Graphical user interface, application, website Description automatically generated

The Recorder panel will then be displayed.

Graphical user interface, text, application Description automatically generated

You can then open the apps you perform your process on and record the actions you will take to complete your required process. (In our example, we’re using a legacy invoice processing app.)

Perform your steps on the apps as you would usually, and each action will show up under Recorded actions in the Recorder panel. When you’re done, click “Finish” on the Recorder panel.

Graphical user interface, application Description automatically generated

Next, select View recording.

Graphical user interface, application, Teams Description automatically generated

You’ll need to create labels to specify what activity you’re doing with the recorded actions (the activities will show up in your process map). Otherwise, you won’t be able to save.

Graphical user interface, application, website Description automatically generated

Click “Add activity” on the right-hand corner and Name the activity. Click “Save” after naming all the activities.

Graphical user interface, application, email Description automatically generated

Graphical user interface, application Description automatically generated

Graphical user interface, text, application, email Description automatically generated

After navigating to Processes, you will notice that the status of the Recording is “Not analyzed”.

A screenshot of a computer Description automatically generated

You can analyse the recording by clicking “Analyze” on the top ribbon.

Graphical user interface, text, application, email, website Description automatically generated

A screenshot of a computer Description automatically generated

Once you have analysed the recording, you will be able to see the “Analytics” option.

Graphical user interface, application Description automatically generated

Click on it to see the process map, time taken, and other information about your process.

Graphical user interface Description automatically generated

Navigating to the “Application” tab will allow you to see the various applications involved in the process and the time spent by each of them.

Graphical user interface Description automatically generated

Try out Microsoft Power Automate’s Process Advisor!

We hope you’ve found this overview of Power Automate’s Process Advisor useful.

But what we’ve shown here really only scratches the surface, though. We’ve only used a small set of recordings just to show the idea.

For Microsoft Power Automate’s Process Advisor to be impactful, you should try it out with real-life work processes that you want to make more efficient. The insights you gain from it might surprise you and help you drive major improvements within a short span of time. Think recording hundreds of instances of the process and getting all your team members involved in the process to record themselves too. This could be life-changing!

If you try it, let us know how it goes by leaving a message in the comments! We’d love to know your experience with Power Automate’s Process Advisor.

Discover Optimisation and Automation Opportunities with Microsoft Power Automate’s Process Advisor Read More »

Power Automate Tips & Tricks

30 Tips & Tricks for Microsoft Power Automate (Part 3)


Power Automate Tips & Tricks

As promised in our previous blog post, this is part 3 of Tips and Tricks to make using Microsoft Power Automate more convenient! In our previous post, we covered tips #11 – #20. Today, we will be covering tips #21 – #30. 

Tip #21 Choosing the correct flow

Tip #22 Add new connection 

Tip #23 Using templates 

Tip #24 Passing inputs to cloud flow

Tip #25 Secure input or output

Tip #26 Using expression actions

Tip #27 Increase speed of “Apply to each” action 

Tip #28 Scope action

Tip #29 Exporting or Importing Flows via Web Portal

Tip #30 Manage gateways


For those of you who prefer to watch the video, you can have a look at the video below. If you prefer to read, just scroll down further for the article.


Power Automate Tip #21: Choosing the Correct Flow

If you navigate to the “My Flows” section on the Power Automate web portal (https://flow.microsoft.com/) and click on the “New flow” tab, you will realise that there are various kinds of flows available. These include Automated cloud flow, Instant cloud flow, Scheduled cloud flow, Desktop flow, Business process flow. Which type of flow should you choose? We’ll explain.

Different types of flows in Microsoft Power Automate web portal

1. Automated cloud flow

You can use this flow when you have a use case that requires a process to be run automatically, such as when a new email arrives or when a file is created.

Building an automated cloud flow in Microsoft Power Automate

2. Instant cloud flow

You can use this to start an automation with the click of a button – manually trigger a flow through the web portal.

Building an instant cloud flow in Microsoft Power Automate

3. Scheduled cloud flow.

You can use this flow if you have a use case that requires you to run the flow at a specific timing.

Building a scheduled cloud flow in Microsoft Power Automate


Power Automate Tip #22: Add new connection

If you navigate to “Data”, under “Connections”, you can add new connections with other applications. Click on the “New connections” tab to see all the different applications you can form connections with.

adding a new connection in Microsoft Power Automate

The list of applications you can make connections with in Microsoft Power Automate

Alternatively, you can create new connections with applications via cloud flows. Navigate to the “My flows” and click on the flow you wish to connect. Then click on the edit tab.

Clicking the edit tab to add new connections in Microsoft Power Automate

When you are adding an action, select the particular application. Once it has been connected successfully, it will reflect inside the Connections tab (on the side bar: Data > Connections)

Microsoft Power Automate interface showing a successful connection


Power Automate Tip #23: Using Templates

If you navigate to the templates section, you will realise that instead of creating a flow from scratch, there are different types of templates you can use depending on your process.

Where to find the Templates section in Microsoft Power Automate

List of Microsoft Power Automate templates available for use

For example, using the “Notify and Email when a new file is uploaded to OneDrive” template, you will have to sign in to your OneDrive and click “create”. Once you click “continue” you will then be brought to a cloud flow with the OneDrive and notifications applications.

Example of setting up a Microsoft Power Automate template


Power Automate Tip #24: Passing Inputs into Cloud Flow

Navigate to “My Flows” on the sidebar. After selecting your desired Cloud Flow, click on “edit”.

How to start passing inputs into Microsoft Power Automate cloud flow

You can create an input variable under “Manually trigger a flow”, by clicking on “+ Add an input”. There are numerous types of inputs such as text, number, email etc, but as an example, we will be using the text type “Please enter URL”.

Choosing types of user input in Microsoft Power Automate

Test this flow by clicking on “Test” in the top right hand corner and selecting “Manually” from the test flow options.

Testing Microsoft Power Automate flow

Selecting

The action will then prompt you to enter URL. However, you will notice entering the URL is mandatory.

The Microsoft Power Automate  flow prompting the user to enter a URL (and it's mandatory)

You can make the field optional by clicking on the three dots icon beside it and selecting “Make the field optional” from the drop-down menu.

Making the field optional in Microsoft Power Automate

Testing the cloud flow will show that the field has now become optional!

The result of testing the Microsoft Power Automate cloud flow after the changes, showing that the field is now optional


Power Automate Tip #25: Secure Inputs and Outputs

Under “Manually trigger a flow”, click on the three dots icon and select settings.

Where to find the secure inputs and outputs settings in Microsoft Power Automate

Under settings, you can secure the inputs or the outputs by toggling the options to On.

The settings to enable secure inputs and secure outputs in Microsoft Power Automate

If the inputs are enabled, the URL variable will only be applicable within the “Manually trigger a flow” action. You will not be able to access it under condition or in the steps after.


Power Automate Tip #26: Using Expression Actions

To illustrate this, we will use the example of creating a flow to check if the input variable is empty. Select “Add an action” and under” Choose an operation” search for “initialise variable”.

Adding an action to start using expressions in Microsoft Power Automate

Initializing a variable to proceed with using expressions in Microsoft Power Automate

In the “Initialise variable” dialogue box, declare the name of the variable and type as Boolean. Click the field for Value, then click on “Expression” tab.

Choosing expression to use in Microsoft Power Automate

For the expression, you need to indicate if(expression: boolean, valueIfTrue: any, valueIfFalse” any). In this case, select “dynamic content” and click on “URL”. The expression will look like if(empty(triggerBody( )[ ‘text’] ), true, false)

Choosing the dynamic content to be used in the expression in Microsoft Power Automate

Once you click “ok”, save the variable, and run the flow, you will get an error which says the text does not exist.

Error after running the flow, showing that 'text' doesn't exist

This is because of the field being optional. To prevent this error, you’ll need to add a “?” before the [‘text’] in the expression for any field that you’ve indicated as optional. The expression should read if(empty(triggerBody( )?[ ‘text’] ), true, false) Adding a ? before ['text] to fix the previous error issue when working with any optional field

The flow will run successfully and return the value “true”.

Successfully running the Microsoft Power Automate flow after the fix in the previous step

The value returned after successfully running the Microsoft Power Automate flow


Power Automate Tip #27: Increase the speed of “Apply to each” action.

Under the “Apply to each” dialogue box, click on the three dots icon and navigate to “settings” on the drop-down menu.

Accessing the menu for

Accessing the settings for

Under settings, turn on the “Concurrency Control”.

Turning on concurrency control for

You can then run more than one record concurrently. However, do take note that if you have any variables involved in “Apply to each”, you should do your testing to ensure the data tallies.

Increasing the


Power Automate Tip #28: Scope action

If you have multiple actions doing the same task, you can use the scope action to group them together and act as one container.

Click the “+” sign where you want to add your action, the click “add an action”. Search for scope action under “Choose an operation”.

Searching for the scope action in Microsoft Power Automate

You can then drag your conditions and other actions inside Scope. You have successfully used the Scope action!

The results after dragging an action (in this case

You can also rename the “Scope” to reflect the task being done by clicking on the three dots icon and selecting “Rename”. In this case, it’s being renamed to “Check if empty”.

The results after renaming the scope action to reflect what we're working on


Power Automate Tip #29: Exporting or Importing Flows via Web Portal

Navigate to “My flows” and select “Export” from the “More commands” (three dots icon) dropdown menu. Export it as a package (.zip) as you’ll need .zip files for importing this flow into another account.

How to access the option to export a Microsoft Power Automate flow.

To import the flow you’ve exported, you can click on the “Import” as shown below.

How to import a flow into a particular Microsoft Power Automate account

You now know how to successfully export or import flows via the web portal!


Power Automate Tip #30: Manage Gateways

Navigate to “Monitor” under “Machines” and click on “Gateways” to see the gateways that you are using.

Viewing the gateways you're using in your Microsoft Power Automate account

You can see how many flows are run in a day by clicking on the desired gateway.

(In this case we haven’t run anything, so there’s nothing to see.)

Viewing the flows run in a day in Microsoft Power Automate through the gateway


30 Power Automate tips & tricks – done and dusted!

There you have it. With this article, we’ve completed our series 30 Tips & Tricks for Microsoft Power Automate. We hope you found these tips useful!

If you missed the previous 2 parts, do check them out so you don’t miss out on useful Power Automate tips from seasoned developers that can help make your Power Automate journey easier, more productive, and more meaningful.

Check out the previous parts here:

30 Tips & Tricks for Microsoft Power Automate (Part 1)

30 Tips & Tricks for Microsoft Power Automate (Part 2)

30 Tips & Tricks for Microsoft Power Automate (Part 3) Read More »